HelpDeskEddy
 HelpDeskEddy Integration
Connect the Cavuer AI Agent to HelpDeskEddy and automate your customer support 24/7 — from the first message to ticket resolution.
 Quick Start
Get your agents up and running in three steps.
Step 1 — Create a Agent in Cavuer
- Sign up at console.cavuer.com
-
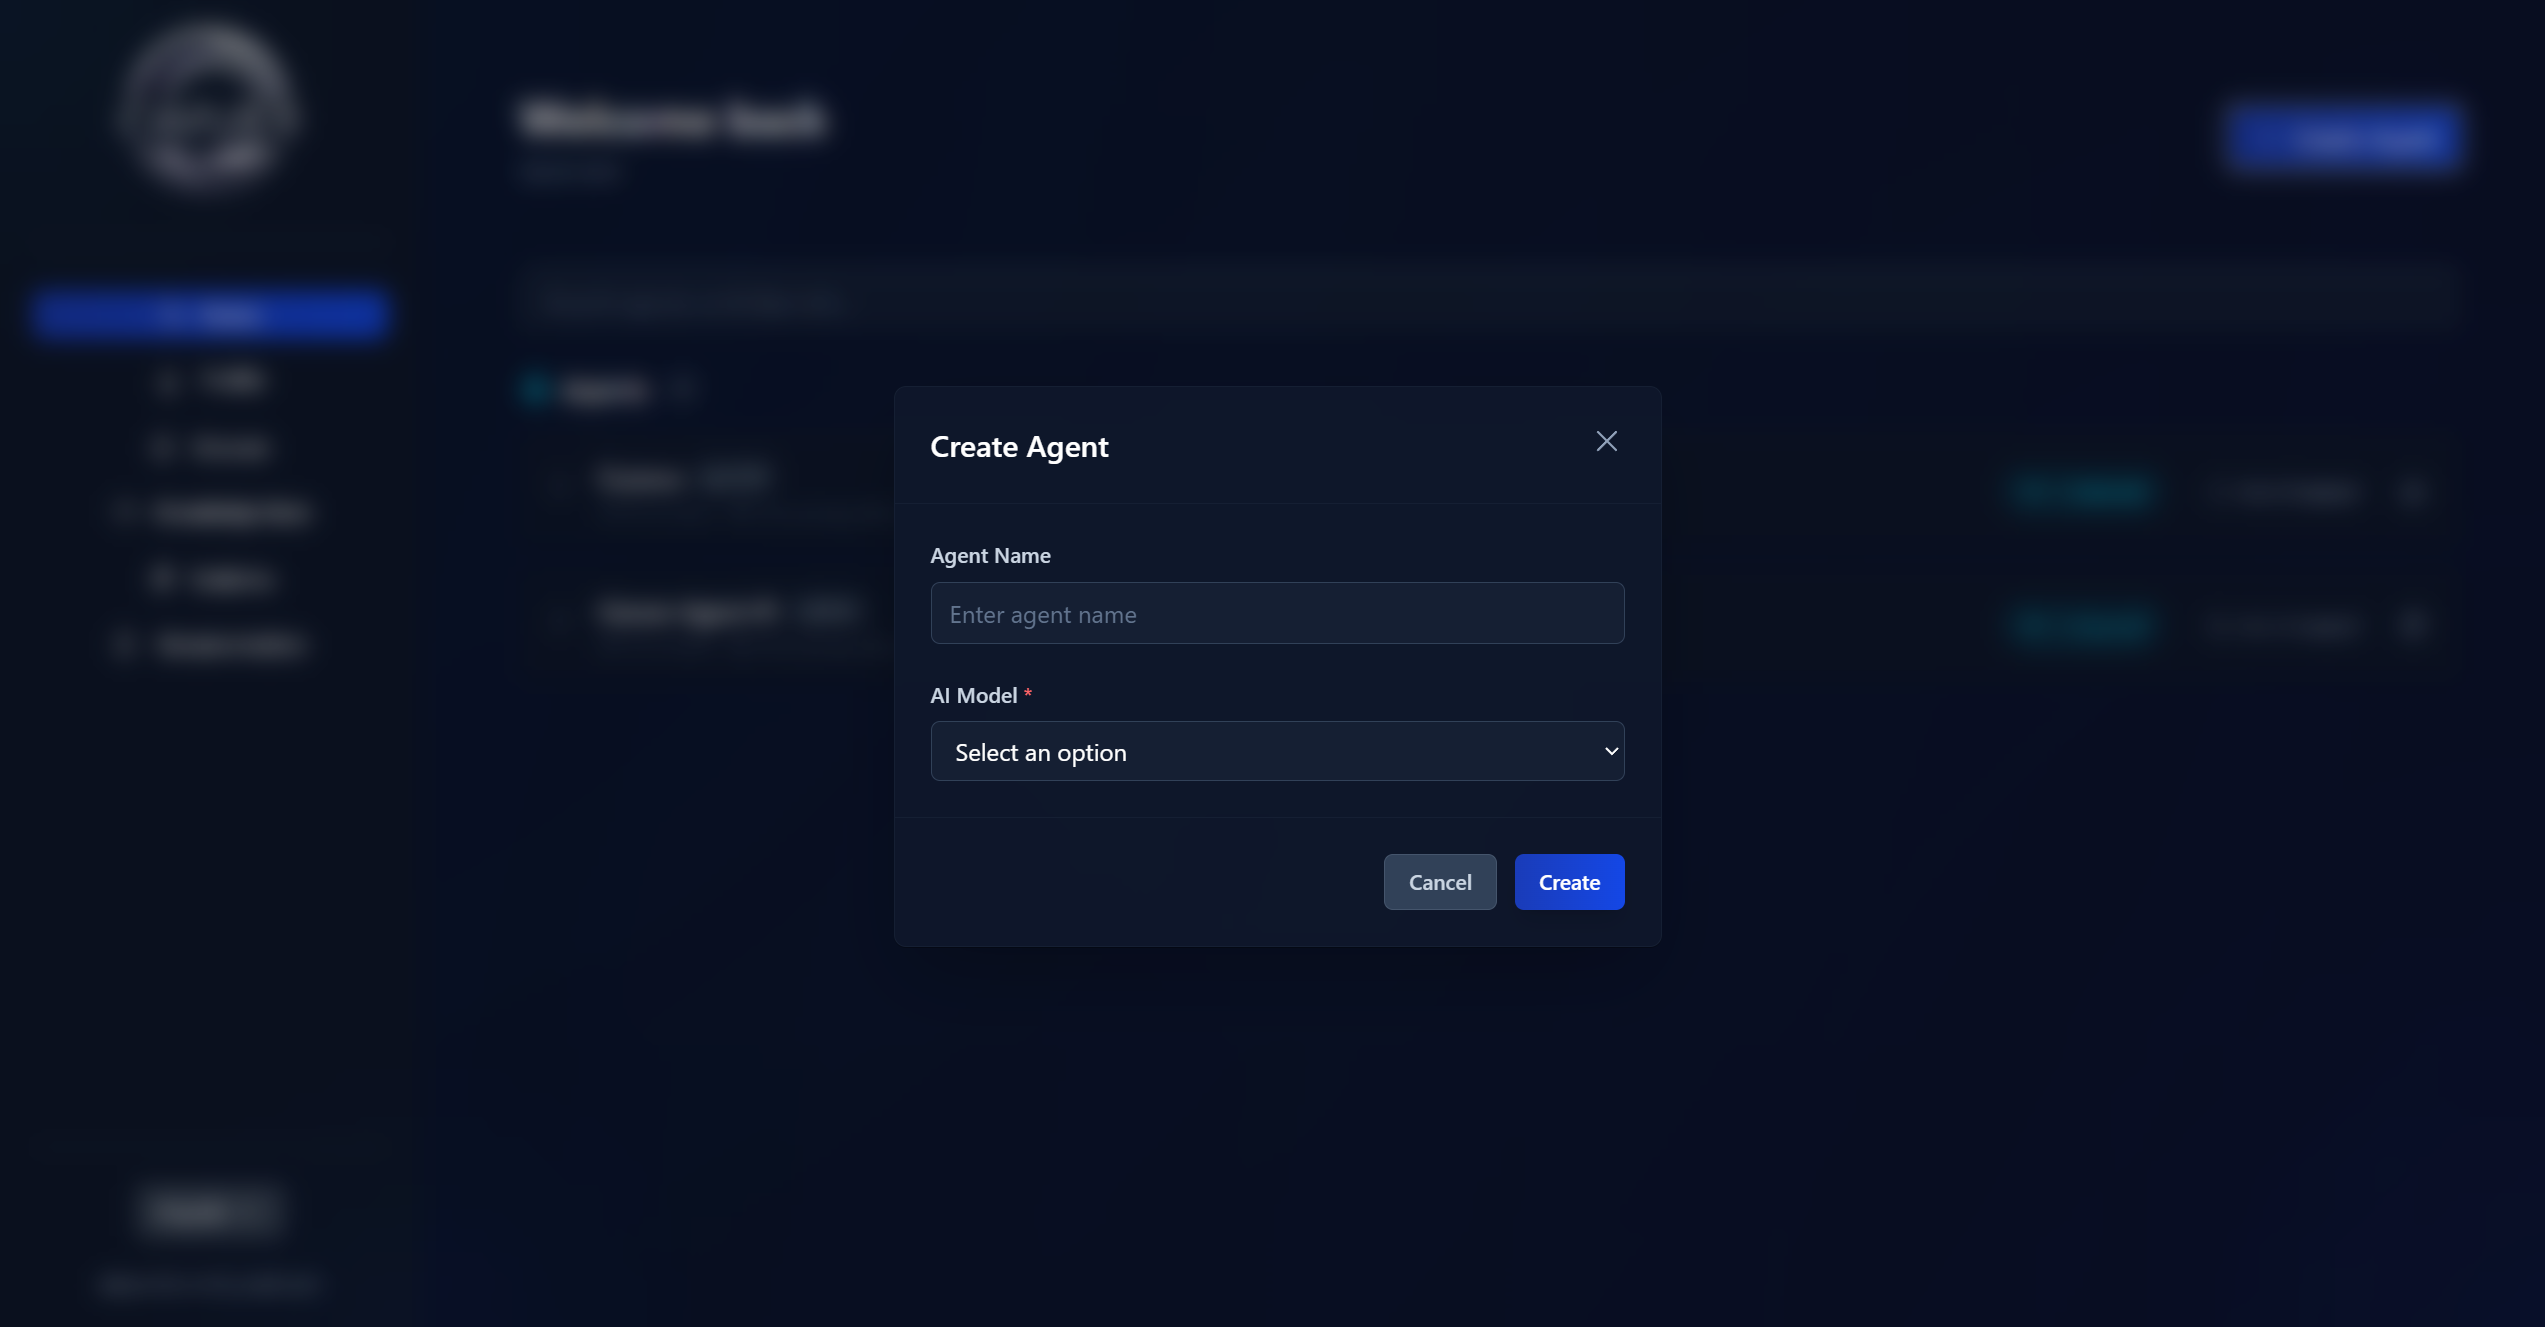
Create an agent. Click the "Create Agent" button in the top right corner, set a name, and choose a language model.
-
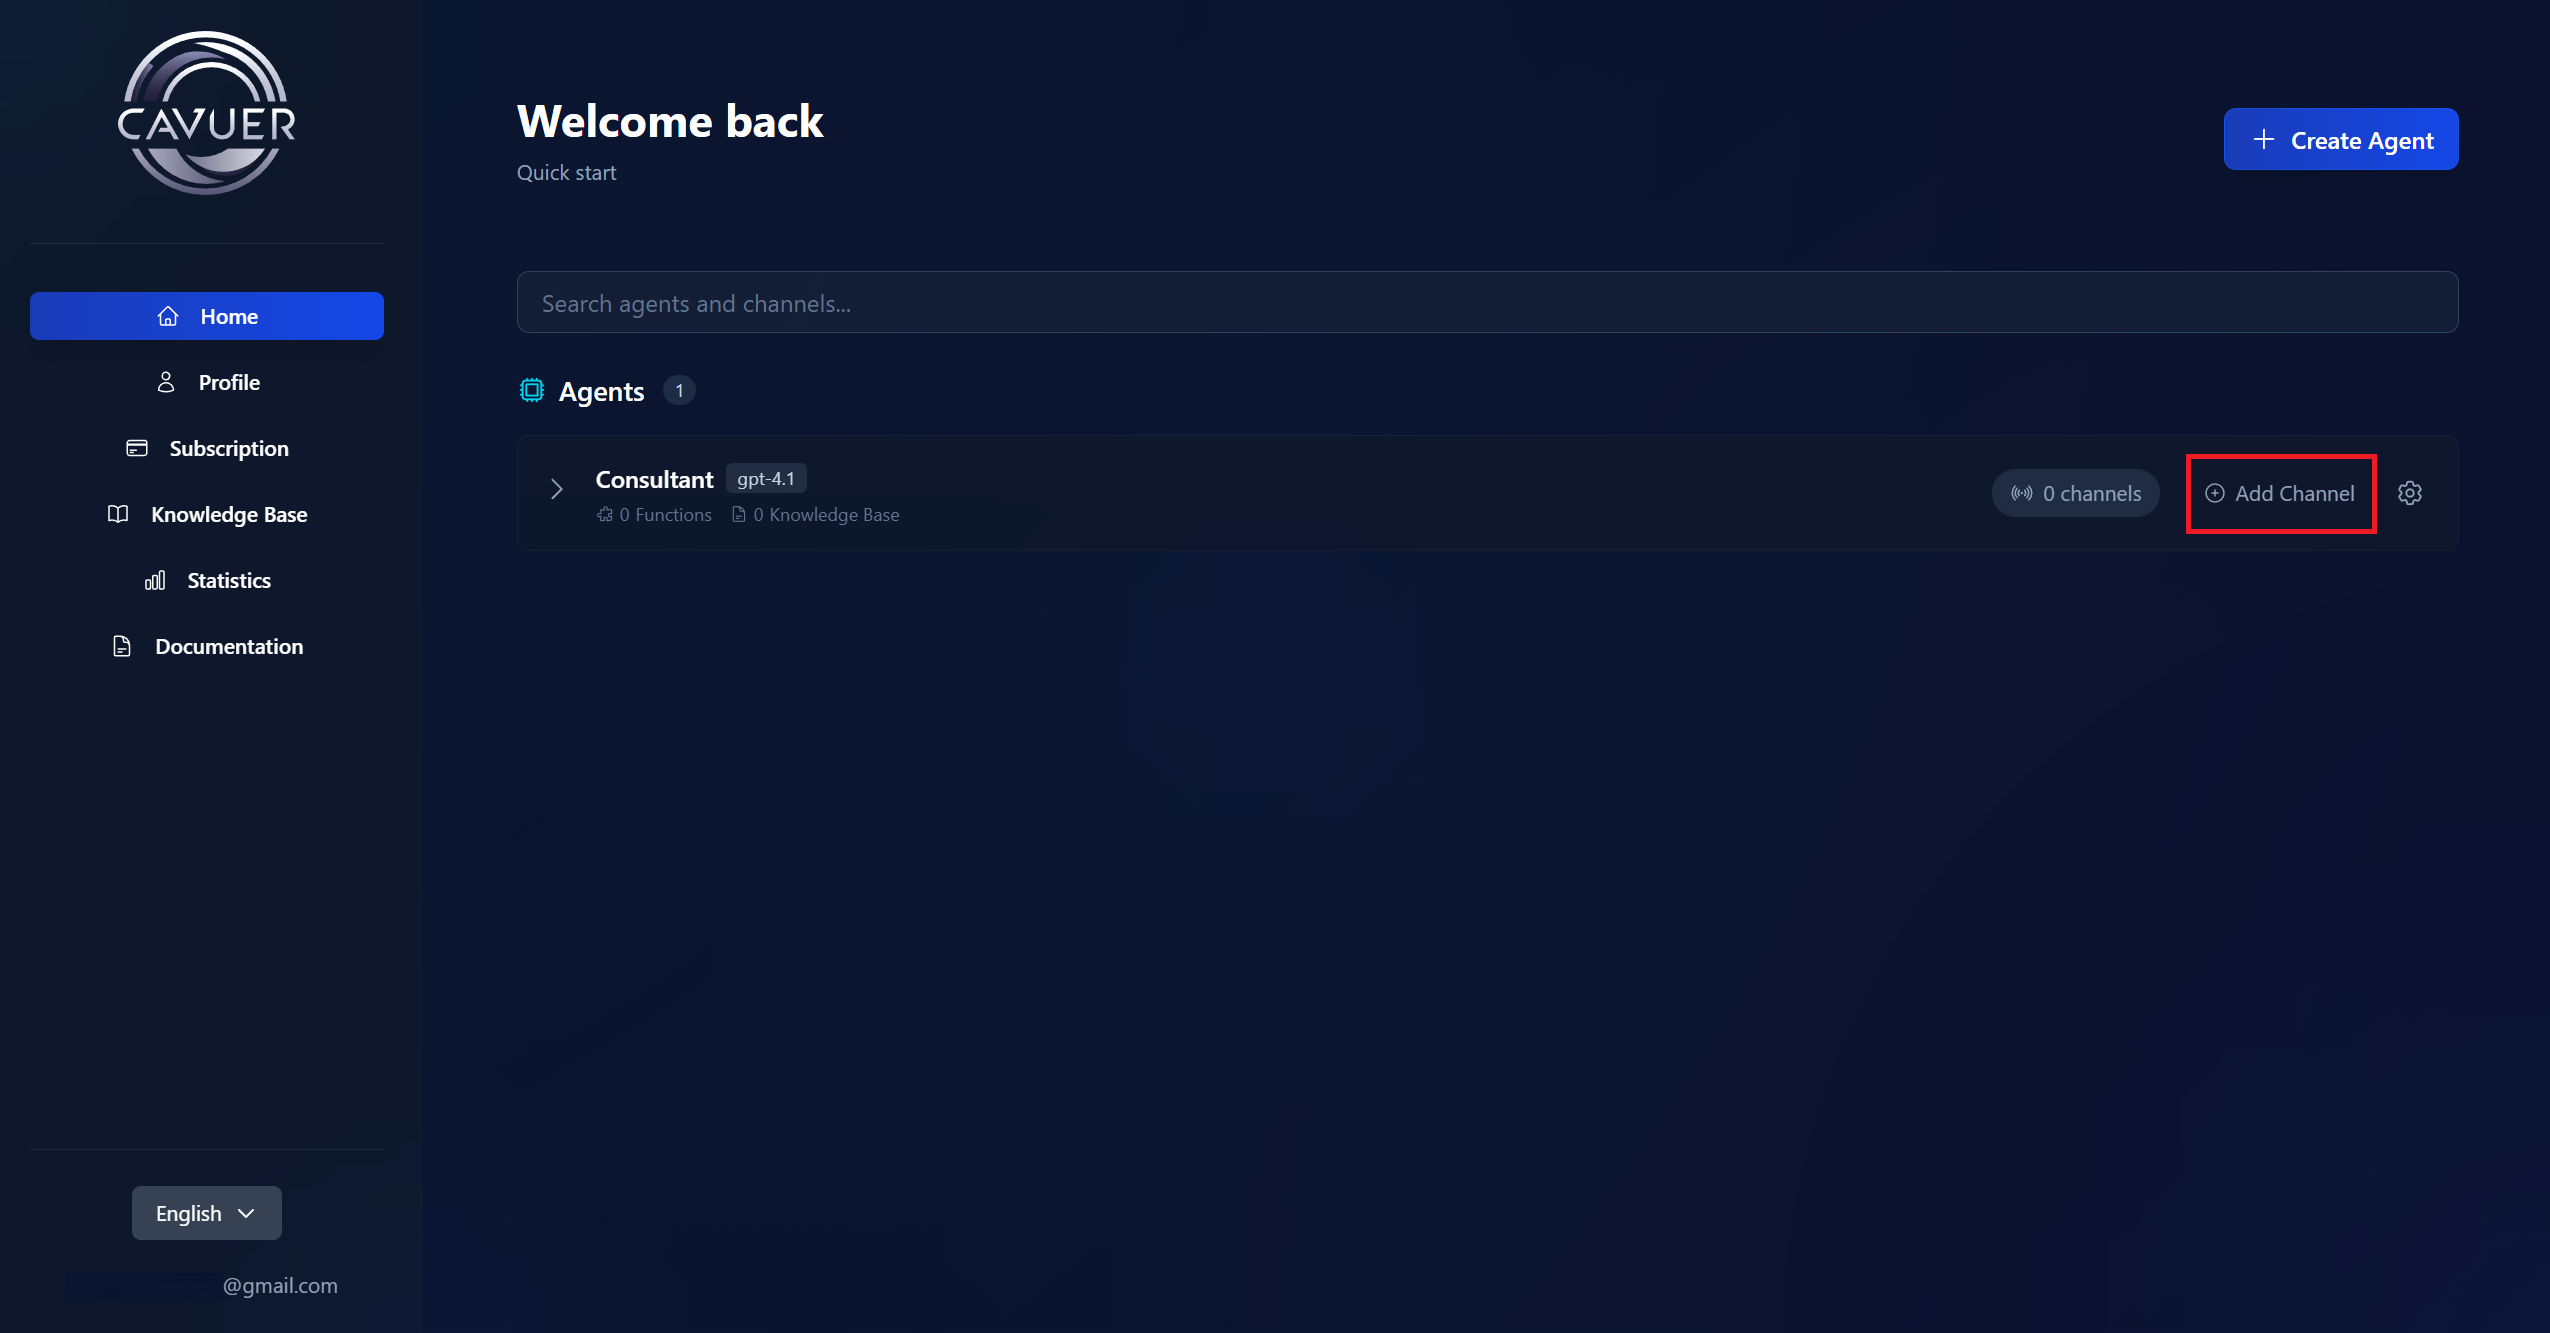
Add a channel to the created agent by clicking Add Channel and select HelpDeskEddy.
-
Fill in the fields:
Field Format Example Subdomain name login.helpdeskeddy.commycompany.helpdeskeddy.comYour API key email:api-keyservice@company.com:f5a9adcb-26fa-...Where to find the API key
Go to Contacts in HelpDeskEddy → select the employee. The API key is visible only to the main Administrator (employee with id 1).
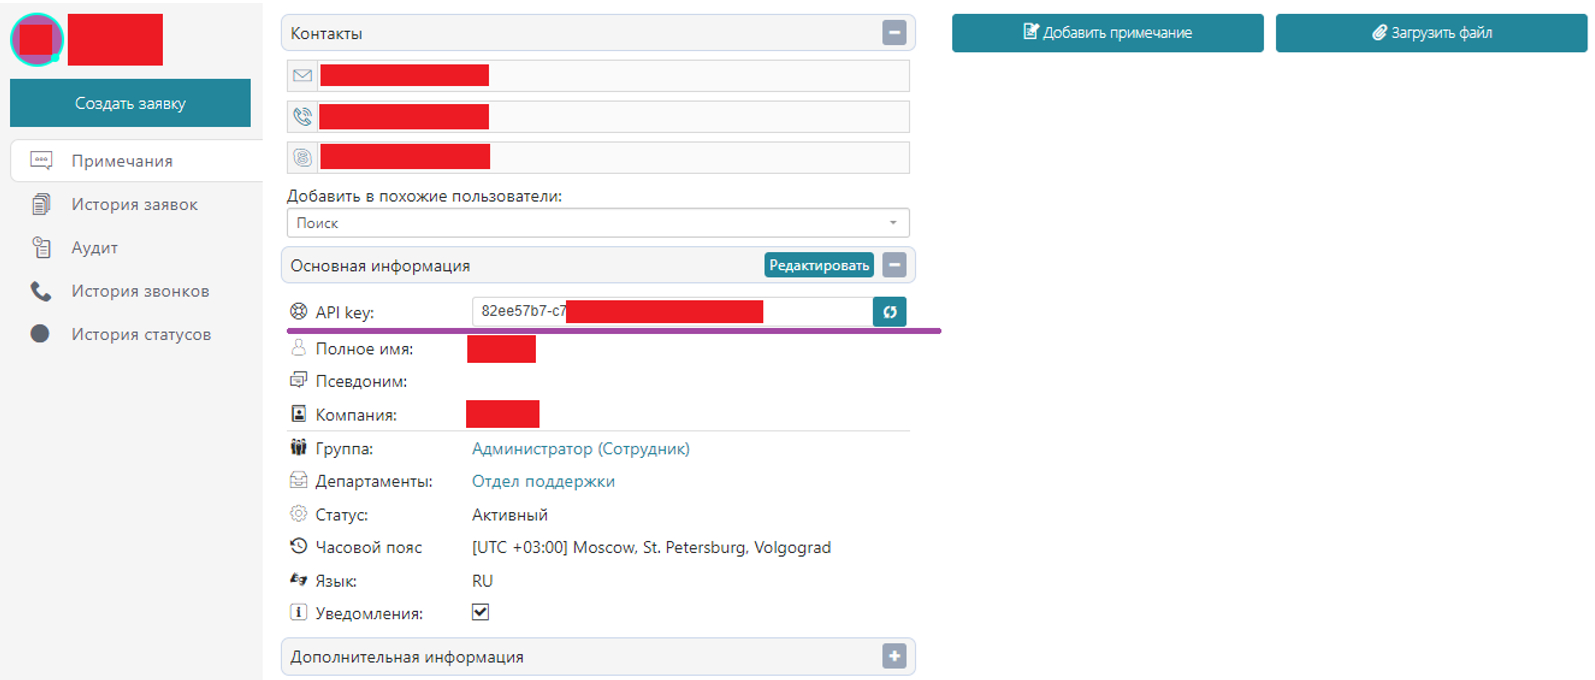
The agent will respond on behalf of the specified employee. We recommend creating a dedicated employee account for the agent.
-
Go to channel Settings → switch the status from
OfftoOn→ Save
Step 2 — Set Up the Webhook in HelpDeskEddy
Create a rule to forward incoming messages to Cavuer.
Go to Management → Dispatcher → Add Rule. Specify the required and optional conditions (ticket source, department, etc.).
Webhook URL:
https://api.cavuer.com/webhooks/helpdeskeddy
Webhook Body:
{
  "text": "{answer_last}",
  "name": "{last_answer_author}",
  "source": "{ticket_source}",
  "ticketId": "{ticket_id}",
  "date": "{last_post_date}",
  "type": "{meta_type}",
  "last_post_user_id": "{last_post_user_id}",
  "files": "{last_answer_attachments_links}"
}
Token format:
CAV-GE5***************_service@company.com:f5a9adcb-26fa-**********
Token structure
Agent ID + _ + employee email + : + employee API key
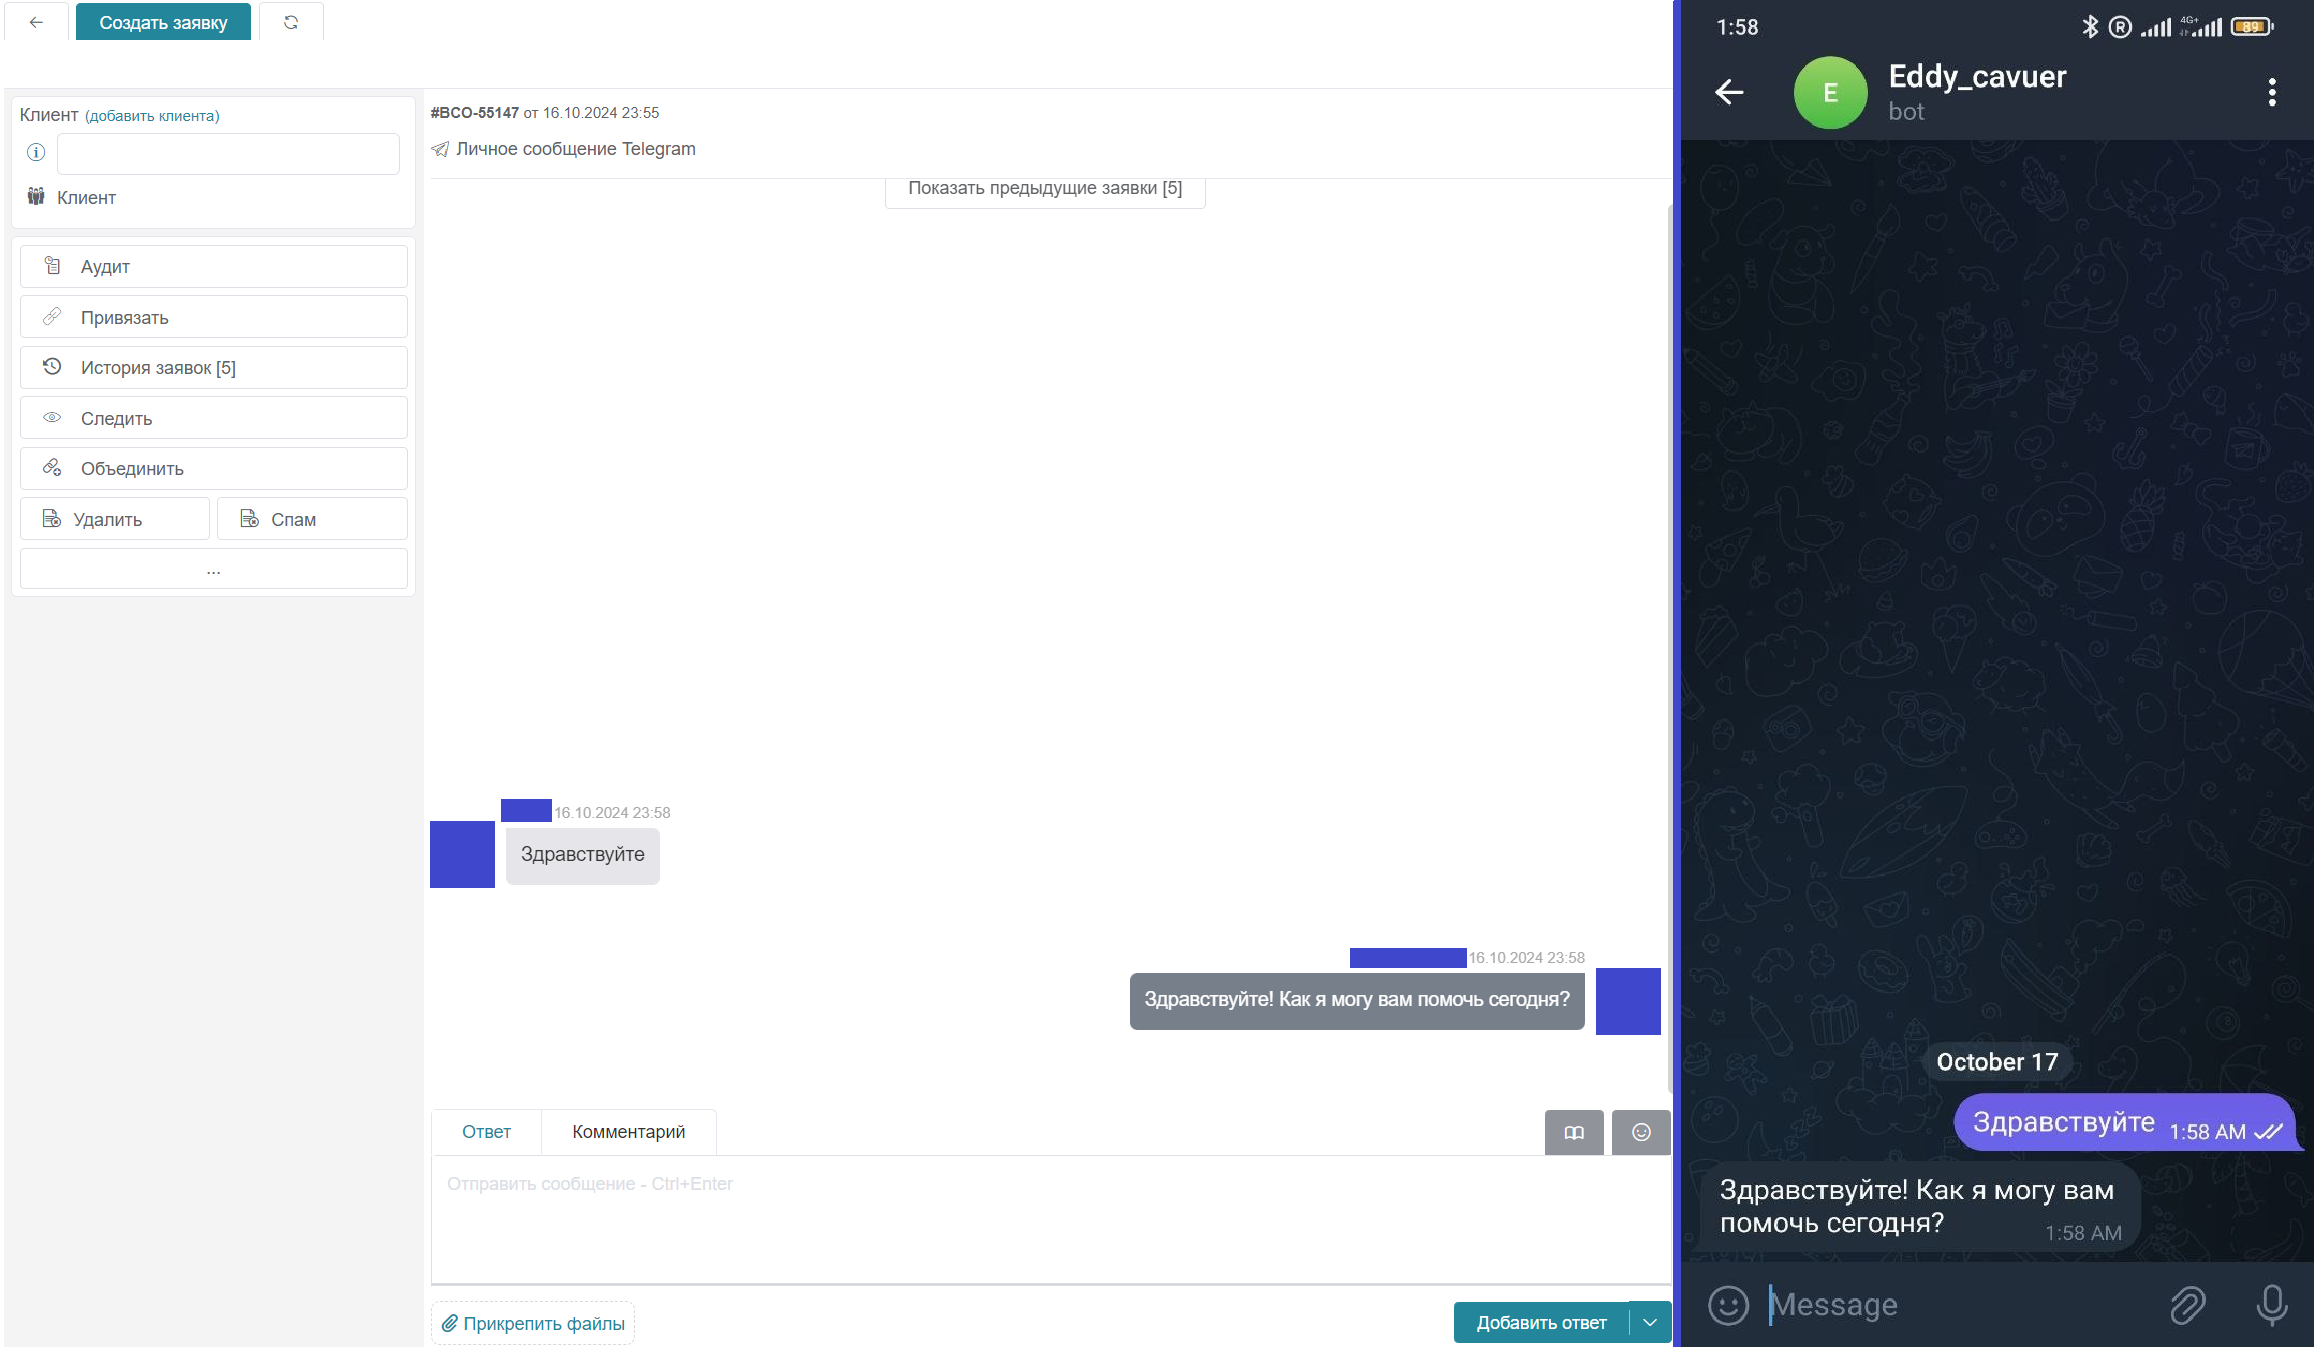
Step 3 — Test the Agent
Send a message through the connected communication channels.
 Done! The agent will now respond to incoming messages in the connected channels.
 Additional Configuration
Configure the Agent in Cavuer
Customize the agent behavior at console.cavuer.com:
| Parameter | Description |
|---|---|
| Name | Rename the agent and channel for convenient use in the Cavuer dashboard |
| Model | Choose the language model |
| Instructions | Agent behavior rules: greeting, company description, operator transfer conditions, language settings. Specify which language the agent should respond in — the user's language or a specific language only |
| Response Delay | Delay before responding (default 0.5s). Useful when customers send multiple messages in a row — the agent will wait and process all messages together in the specified channel them all together |
| Process Images | Allows the agent to view and analyze the content of images |
| Process Audio | Allows the agent to recognize voice messages |
| Knowledge Base | Upload .txt, .pdf, or .docx files and link them in the agent settings |
Full parameter reference: Agent and channel setup
Knowledge Base Setup
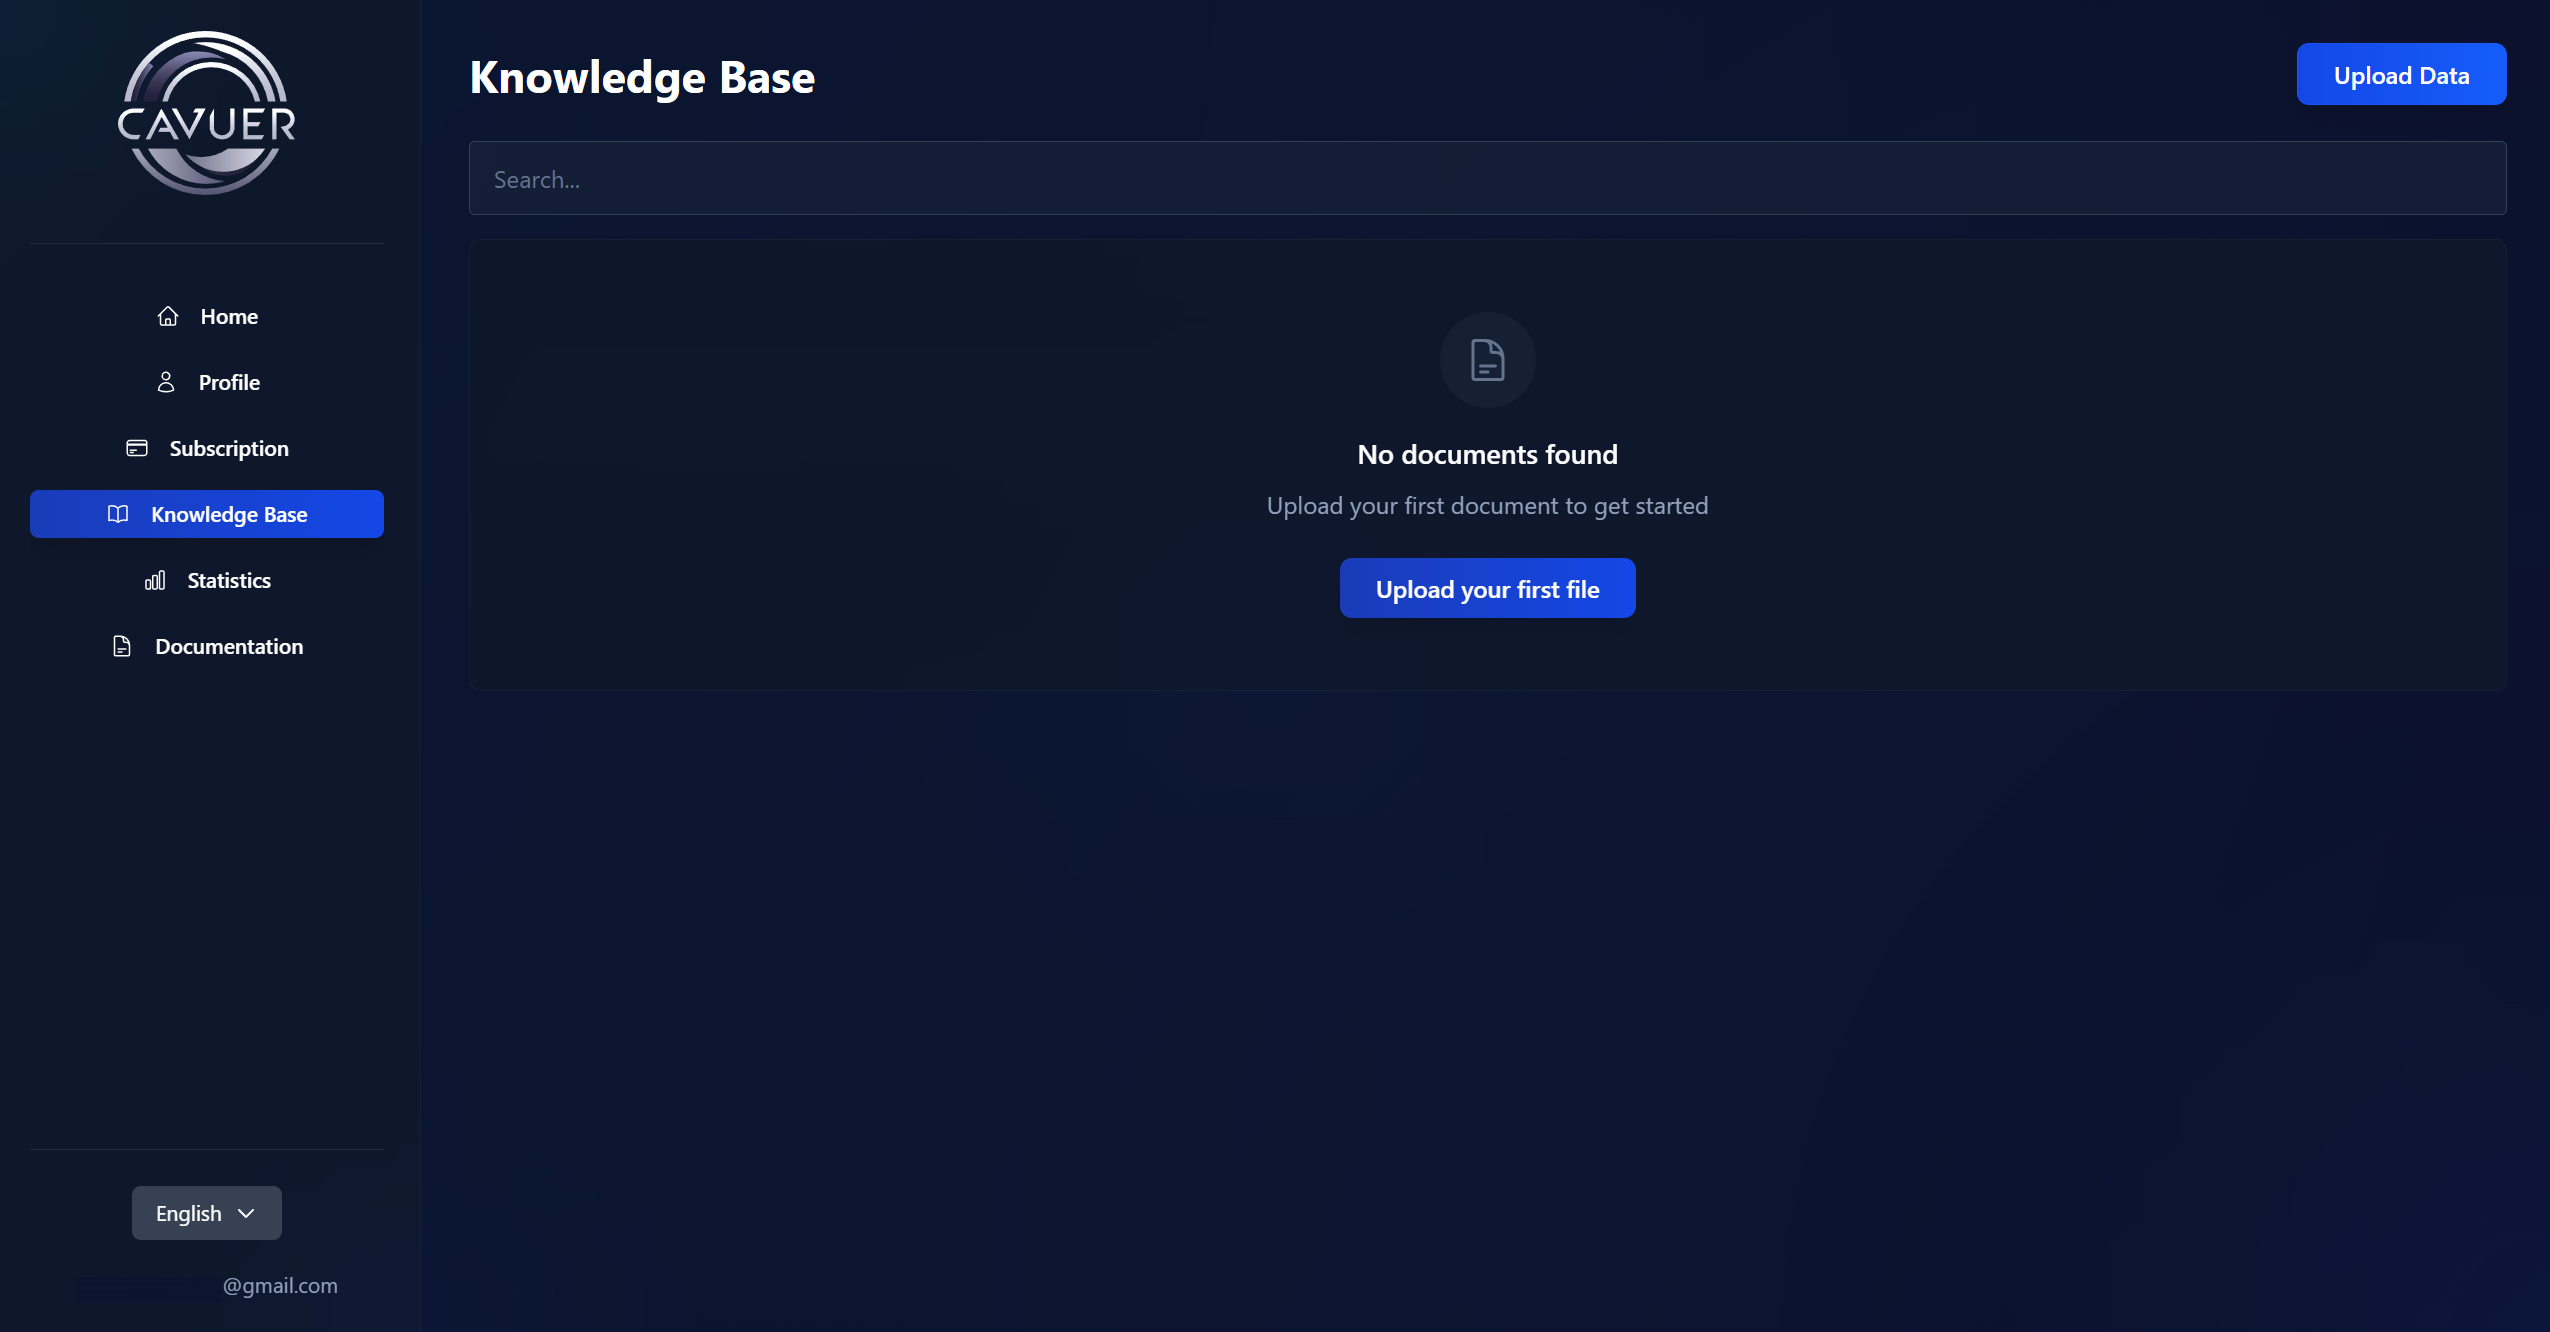
The Knowledge Base is the agent's source of information. There are two ways to populate it:
1. Uploading individual articles. Go to the Knowledge Base section → click "Upload Data" → on the "File" or "Text" tab, enter a title and add the content (.pdf, .docx, .txt files or plain text).
2. Creating collections. Click "Collections" → "Add Collection" and choose a source type: Website, Yandex Wiki, or Confluence. Cavuer will automatically crawl and index the pages.
Then, in the agent settings under Knowledge Base, click "Link Data", select the required articles or collections, and save your changes. For more details, see Knowledge Base.
Knowledge Base Best Practices
- Break up large texts — create smaller articles for specific topics (e.g. separate articles for "Delivery", "Payment", "Returns")
- When editing, use the "Replace Source" function — simple text edits don't update the search index
- Remove unnecessary pages from collections — this improves the accuracy of relevant information retrieval
- Link to documentation — upload a brief summary and include a link to the full version
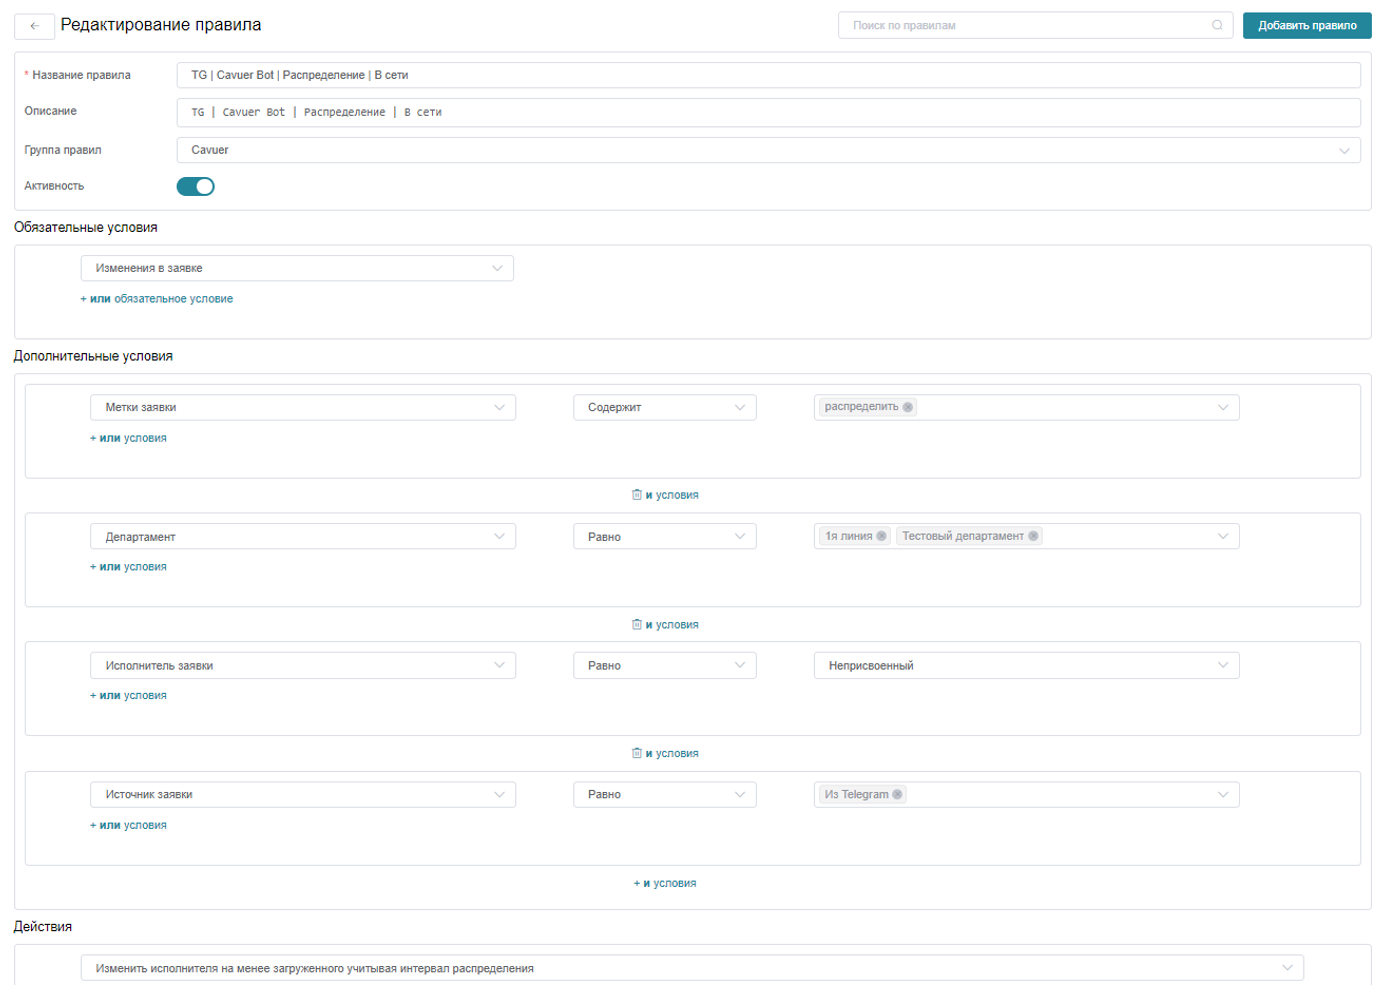
Ticket Assignment to the Agent
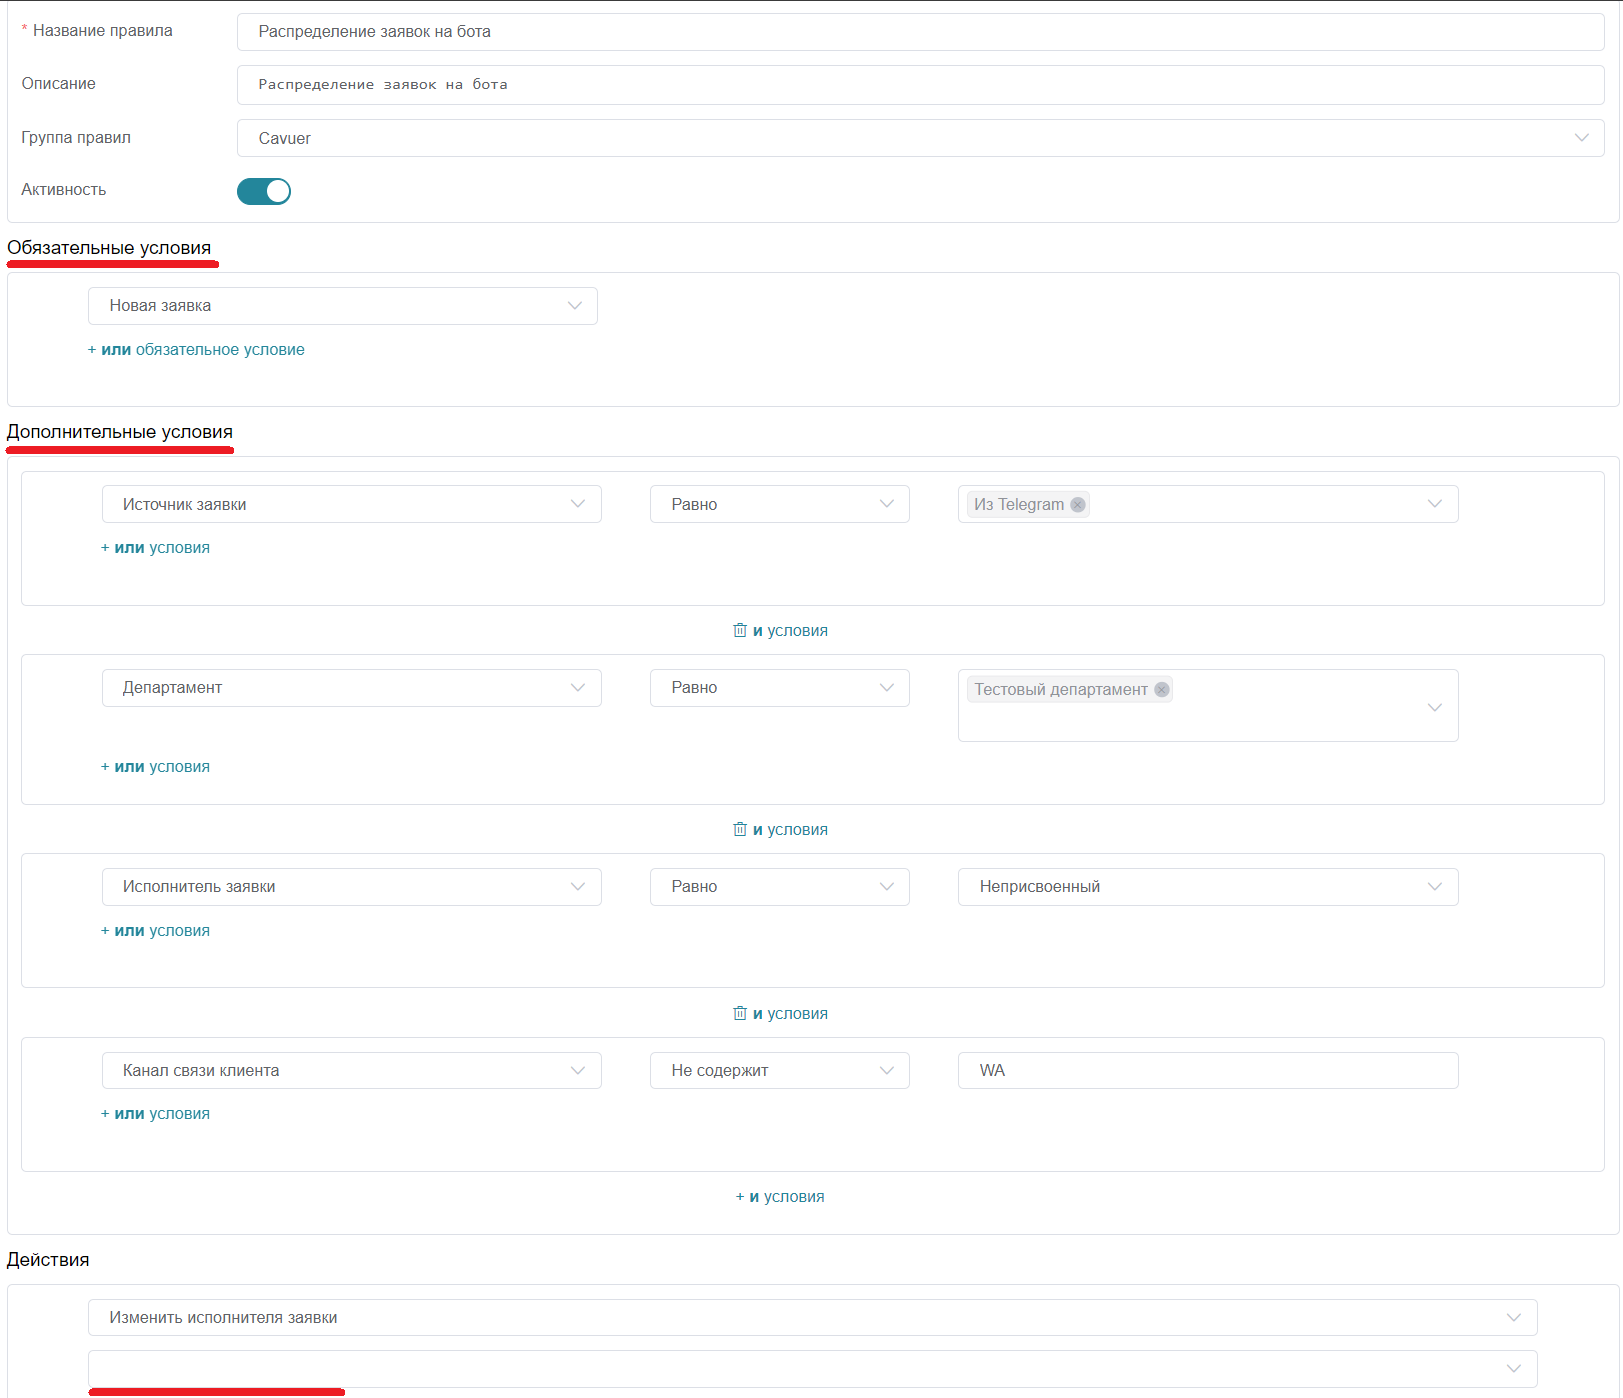
Add a rule in HelpDeskEddy to assign tickets to the agent. Go to Management → Dispatcher → Add Rule.
| Condition | Value |
|---|---|
| Required | New ticket |
| Optional | Ticket source, Department, Assignee (employee whose API key and email were used when creating the agent in Cavuer) |
| Action | Assign to the employee (agent) |
Transfer Tickets to a Human Operator
Set up the ability to transfer tickets to an operator when needed.
1. Add a Button
Go to Management → Ticket Fields → Add Field Group (e.g. Cavuer), then Add Field:
| Parameter | Value |
|---|---|
| Name | Transfer Assignee |
| Field Type | Button |
| Button Click | Select all employees and admins |

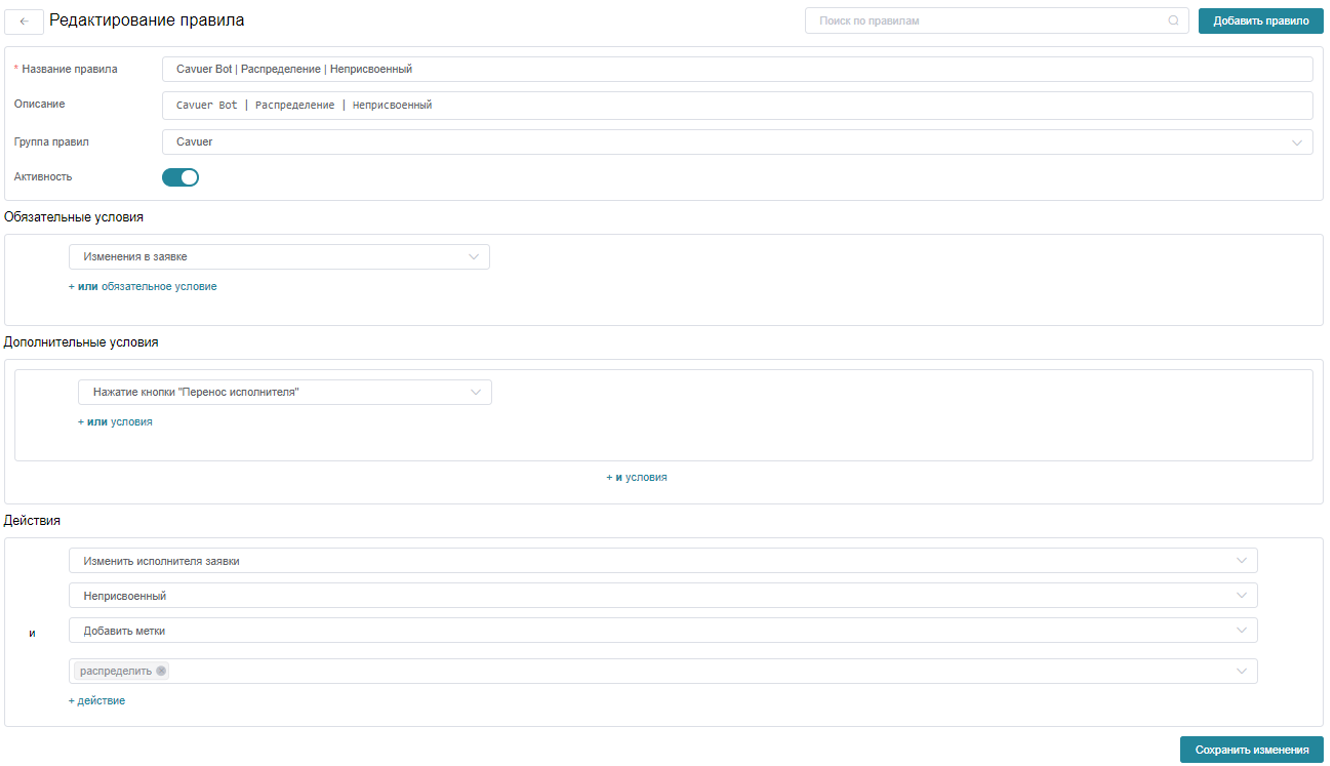
2. Create Transfer Rules
Rule "Transfer Assignee (1)" — triggered when the button is pressed (this rule is needed so that when an operator is requested and the previously created button is automatically pressed, the assignee changes to "Unassigned" and a label is added to the ticket for further distribution to available operators):
- Required condition: Changes in ticket
- Optional condition: Button click
Transfer Assignee - Action: Assignee → Unassigned, add label
distribute
Rule "Transfer Assignee (2)" — distributes the ticket to an available operator (in this rule, the ticket that needs to be transferred to an operator has the status "Unassigned" with the label "Distribute", and it will be assigned to an available employee based on communication channel and workload):
- Required condition: Changes in ticket
- Optional condition: Ticket labels → contains →
distribute - Action: Assign to an available employee (based on channel and workload)
The "Transfer Assignee (2)" rule can have multiple variants — for example, separate rules for different communication channels.
3. Enable the Transfer Function in Agent Settings in Cavuer
Go to the Cavuer dashboard → Agent Settings → Manage Tools → Change Eddy Ticket Owner → Connect (specify the button ID)
Learn more about connecting functions in this article
Auto-Close Tickets
Add a rule to automatically close tickets. If the last response was from the agent, the rule will close the ticket after the specified time, for example 5 minutes (according to HelpDeskEddy documentation, this rule triggers within a 1–20 minute window, so actual closure time may range from 5 to 25 minutes).
| Condition | Value |
|---|---|
| Required | Time after last response (e.g. 5 min) |
| Optional | Status ≠ Resolved, Last response by employee, Assignee = agent, Department |
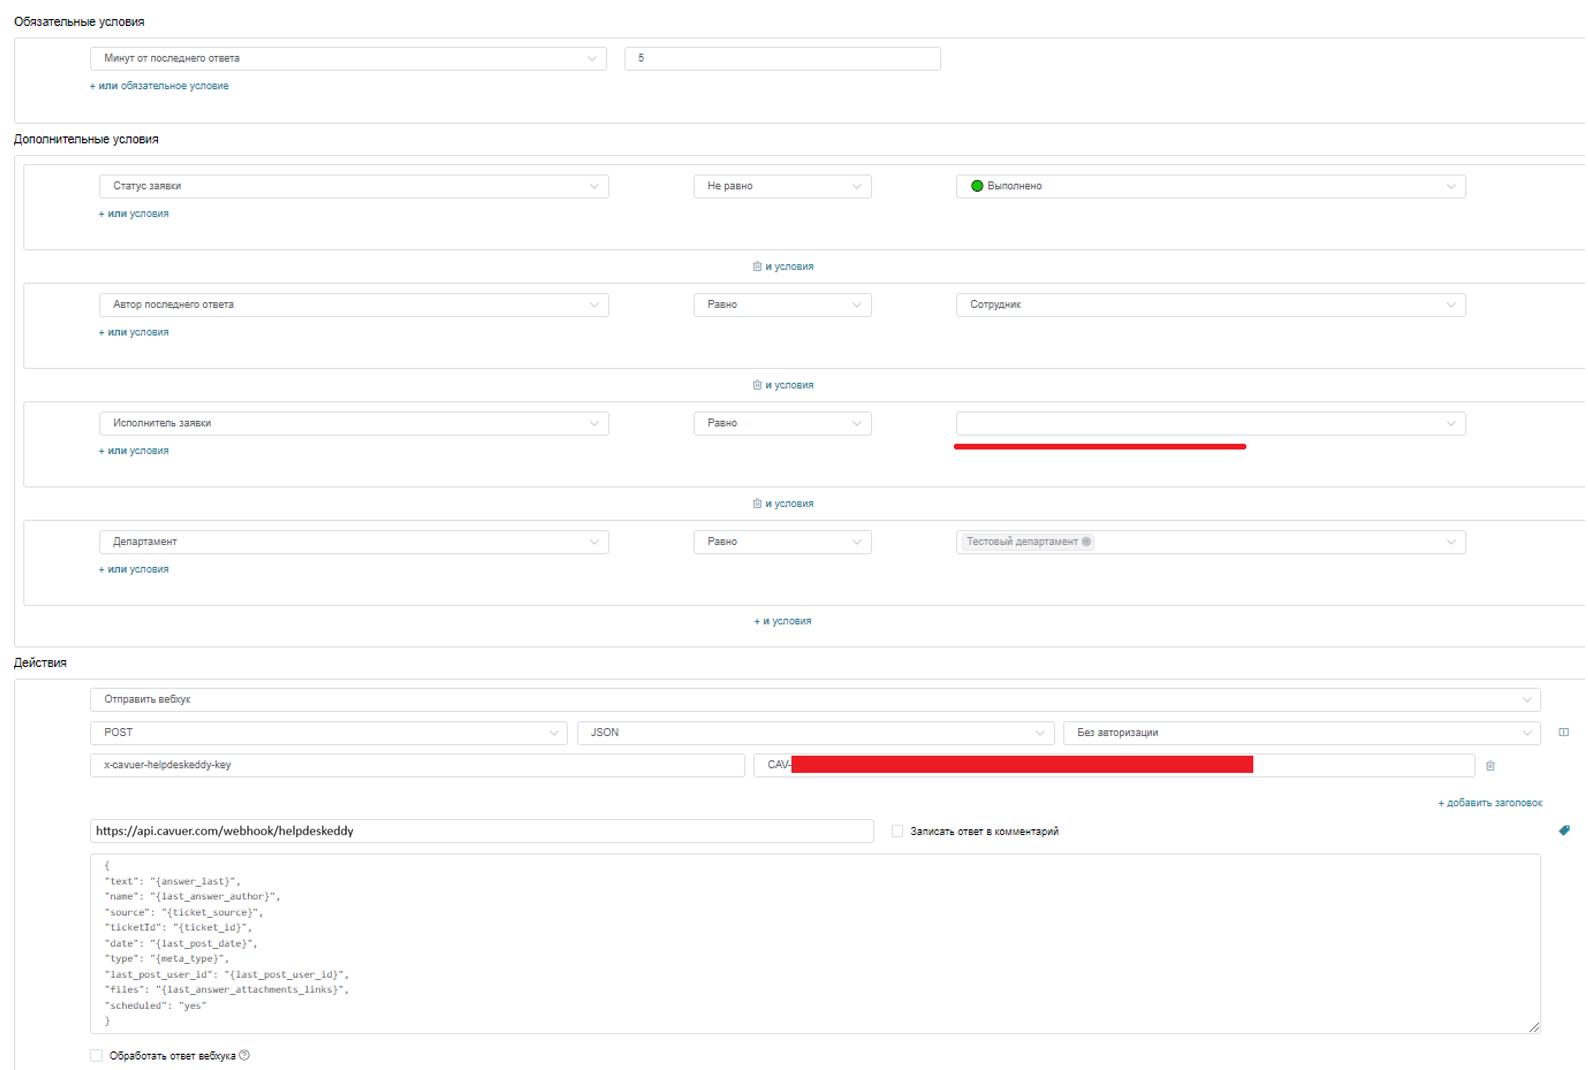
Webhook URL: https://api.cavuer.com/webhooks/helpdeskeddy
Webhook Body:
{
  "text": "{answer_last}",
  "name": "{last_answer_author}",
  "source": "{ticket_source}",
  "ticketId": "{ticket_id}",
  "date": "{last_post_date}",
  "type": "{meta_type}",
  "last_post_user_id": "{last_post_user_id}",
  "files": "{last_answer_attachments_links}",
  "scheduled": "yes"
}
Use the same token format as in Step 2.
Per HelpDeskEddy documentation, time-based rules trigger within a 1–20 minute window, so actual closure time may range from 5 to 25 minutes.
Enable the Close Function in Agent Settings in Cavuer
Go to the Cavuer dashboard → Agent Settings → Manage Tools → Close Eddy Ticket → Connect
Learn more about connecting functions in this article
 Recommendations
Hide the Added Button from the Interface
Copy the button ID and add CSS in Global Settings → Appearance → Advanced Settings → CSS Stylesheet:
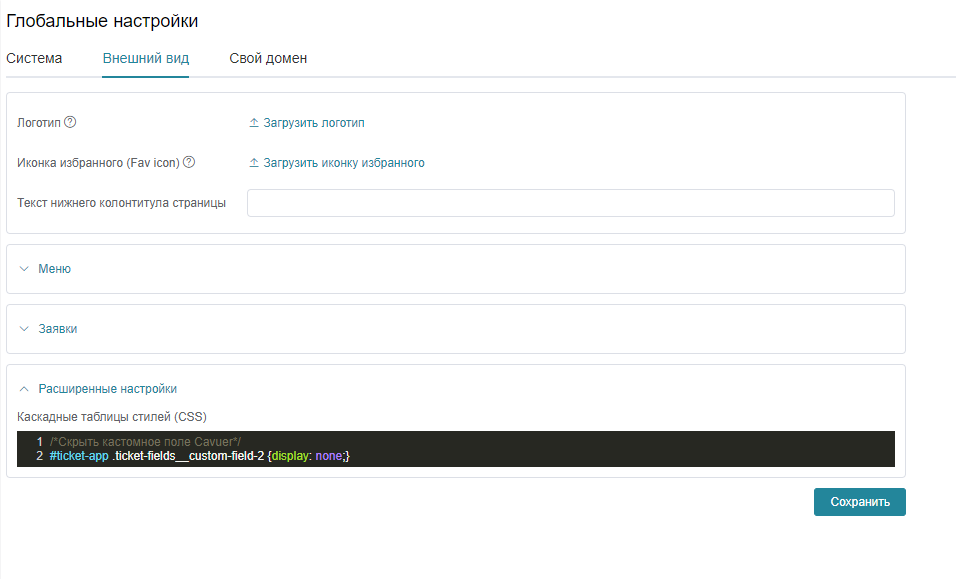
/* Hide Cavuer custom field */
#ticket-app .ticket-fields__custom-field-2 { display: none; }
Replace 2 with your actual button ID.
Need Help?
If you have any questions about configuring your agent or connecting a channel, please contact our support team.