Bitrix24
 Bitrix24 Integration
Connect a Cavuer AI agent to Bitrix24 Open Channels and automate customer support 24/7 — incoming requests are handled by the agent, and conversations are saved in the CRM.
There are two ways to connect an AI agent to Bitrix24. Choose the one that suits you:
| Description | When to use | |
|---|---|---|
| Option 1 (recommended) | Connect Cavuer channels to Bitrix24 Open Channels | You already have channels in Cavuer (Telegram, WhatsApp, etc.) and want to see conversations in Bitrix24 |
| Option 2 | Connect a Cavuer AI agent as a chatbot to Bitrix24 channels | You already have communication channels set up in the Bitrix24 Contact Center and want to add an AI agent to them |
Connecting Cavuer Channels to Bitrix24 Open Channels (option 1)
Connect your existing Cavuer channels (Telegram, WhatsApp, etc.) to Bitrix24 Open Channels. Messages from Cavuer channels will appear in Bitrix24, and replies from Bitrix24 will be sent back to customers.
Step 1 — Install the Cavuer App in Bitrix24
- Go to your Bitrix24 portal
- Open the Market and find the Cavuer app
-
Click Install and grant the required permissions
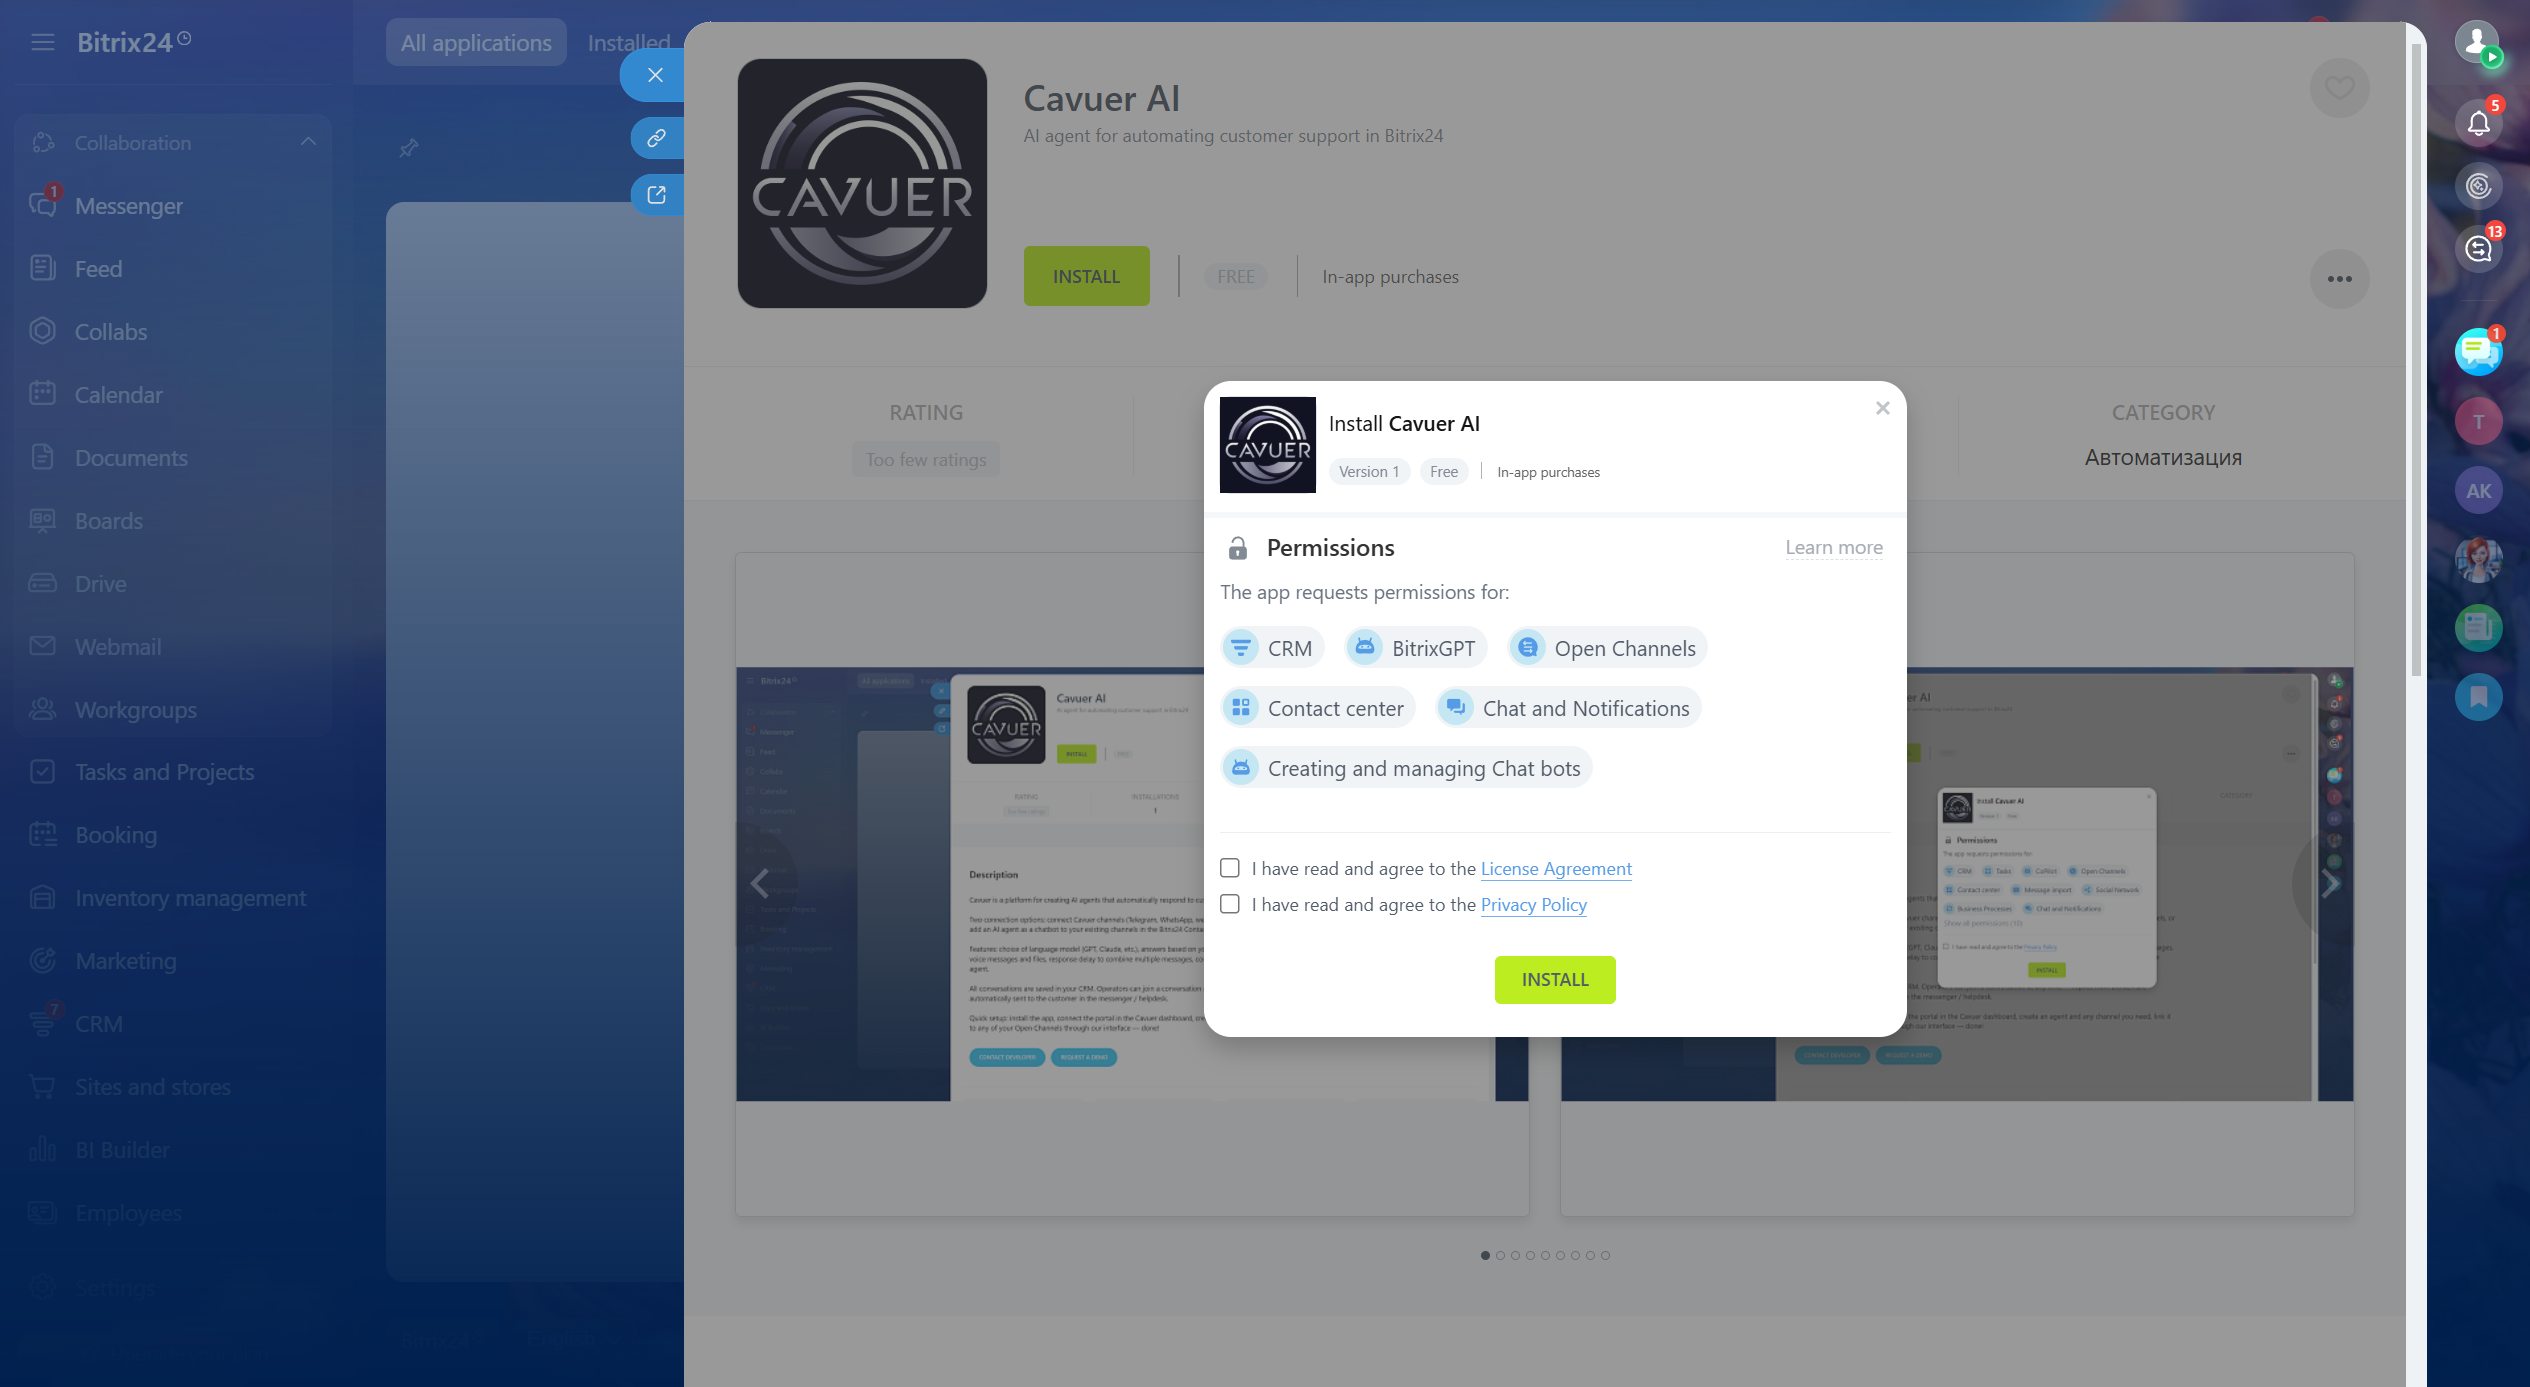
-
Open the installed application and click Connect to Cavuer. You must be logged into your Cavuer account beforehand. If you do not have an account, you will need to register, verify your account, and log in; then, return to the application page in Bitrix24 and click Connect to Cavuer
- After this, you will be redirected to your Cavuer dashboard. Bitrix24 will be automatically connected in the Integrations section
Step 2 — Set Up an Agent and Channels in Cavuer
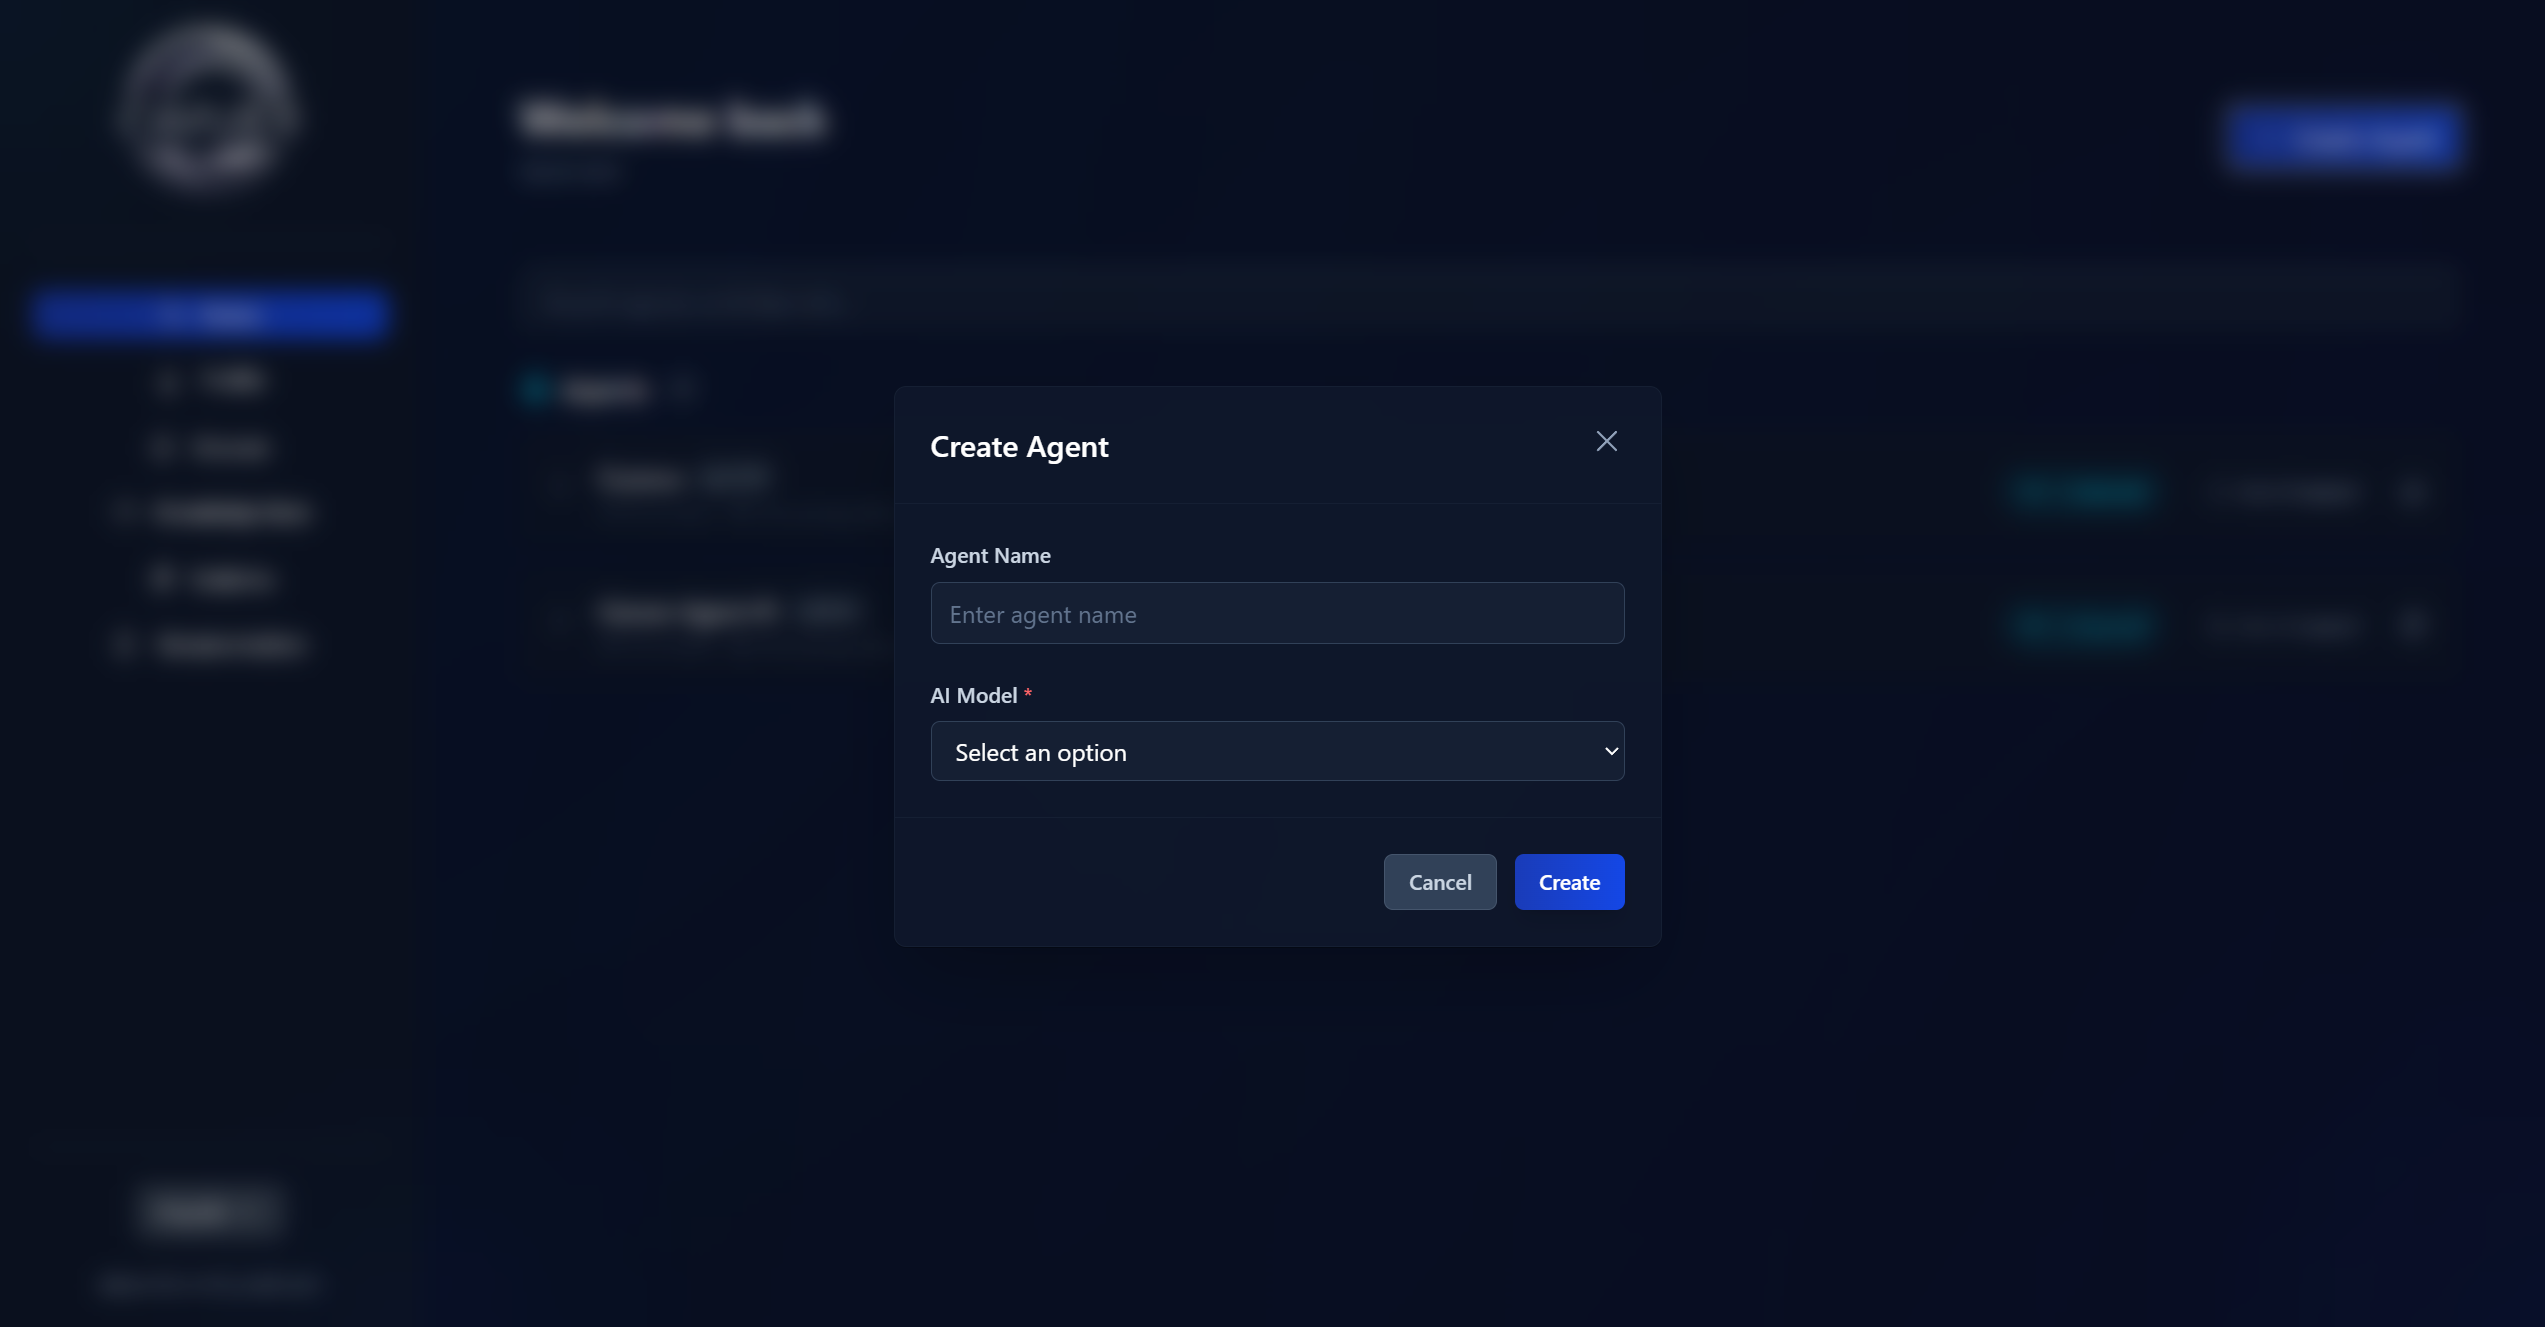
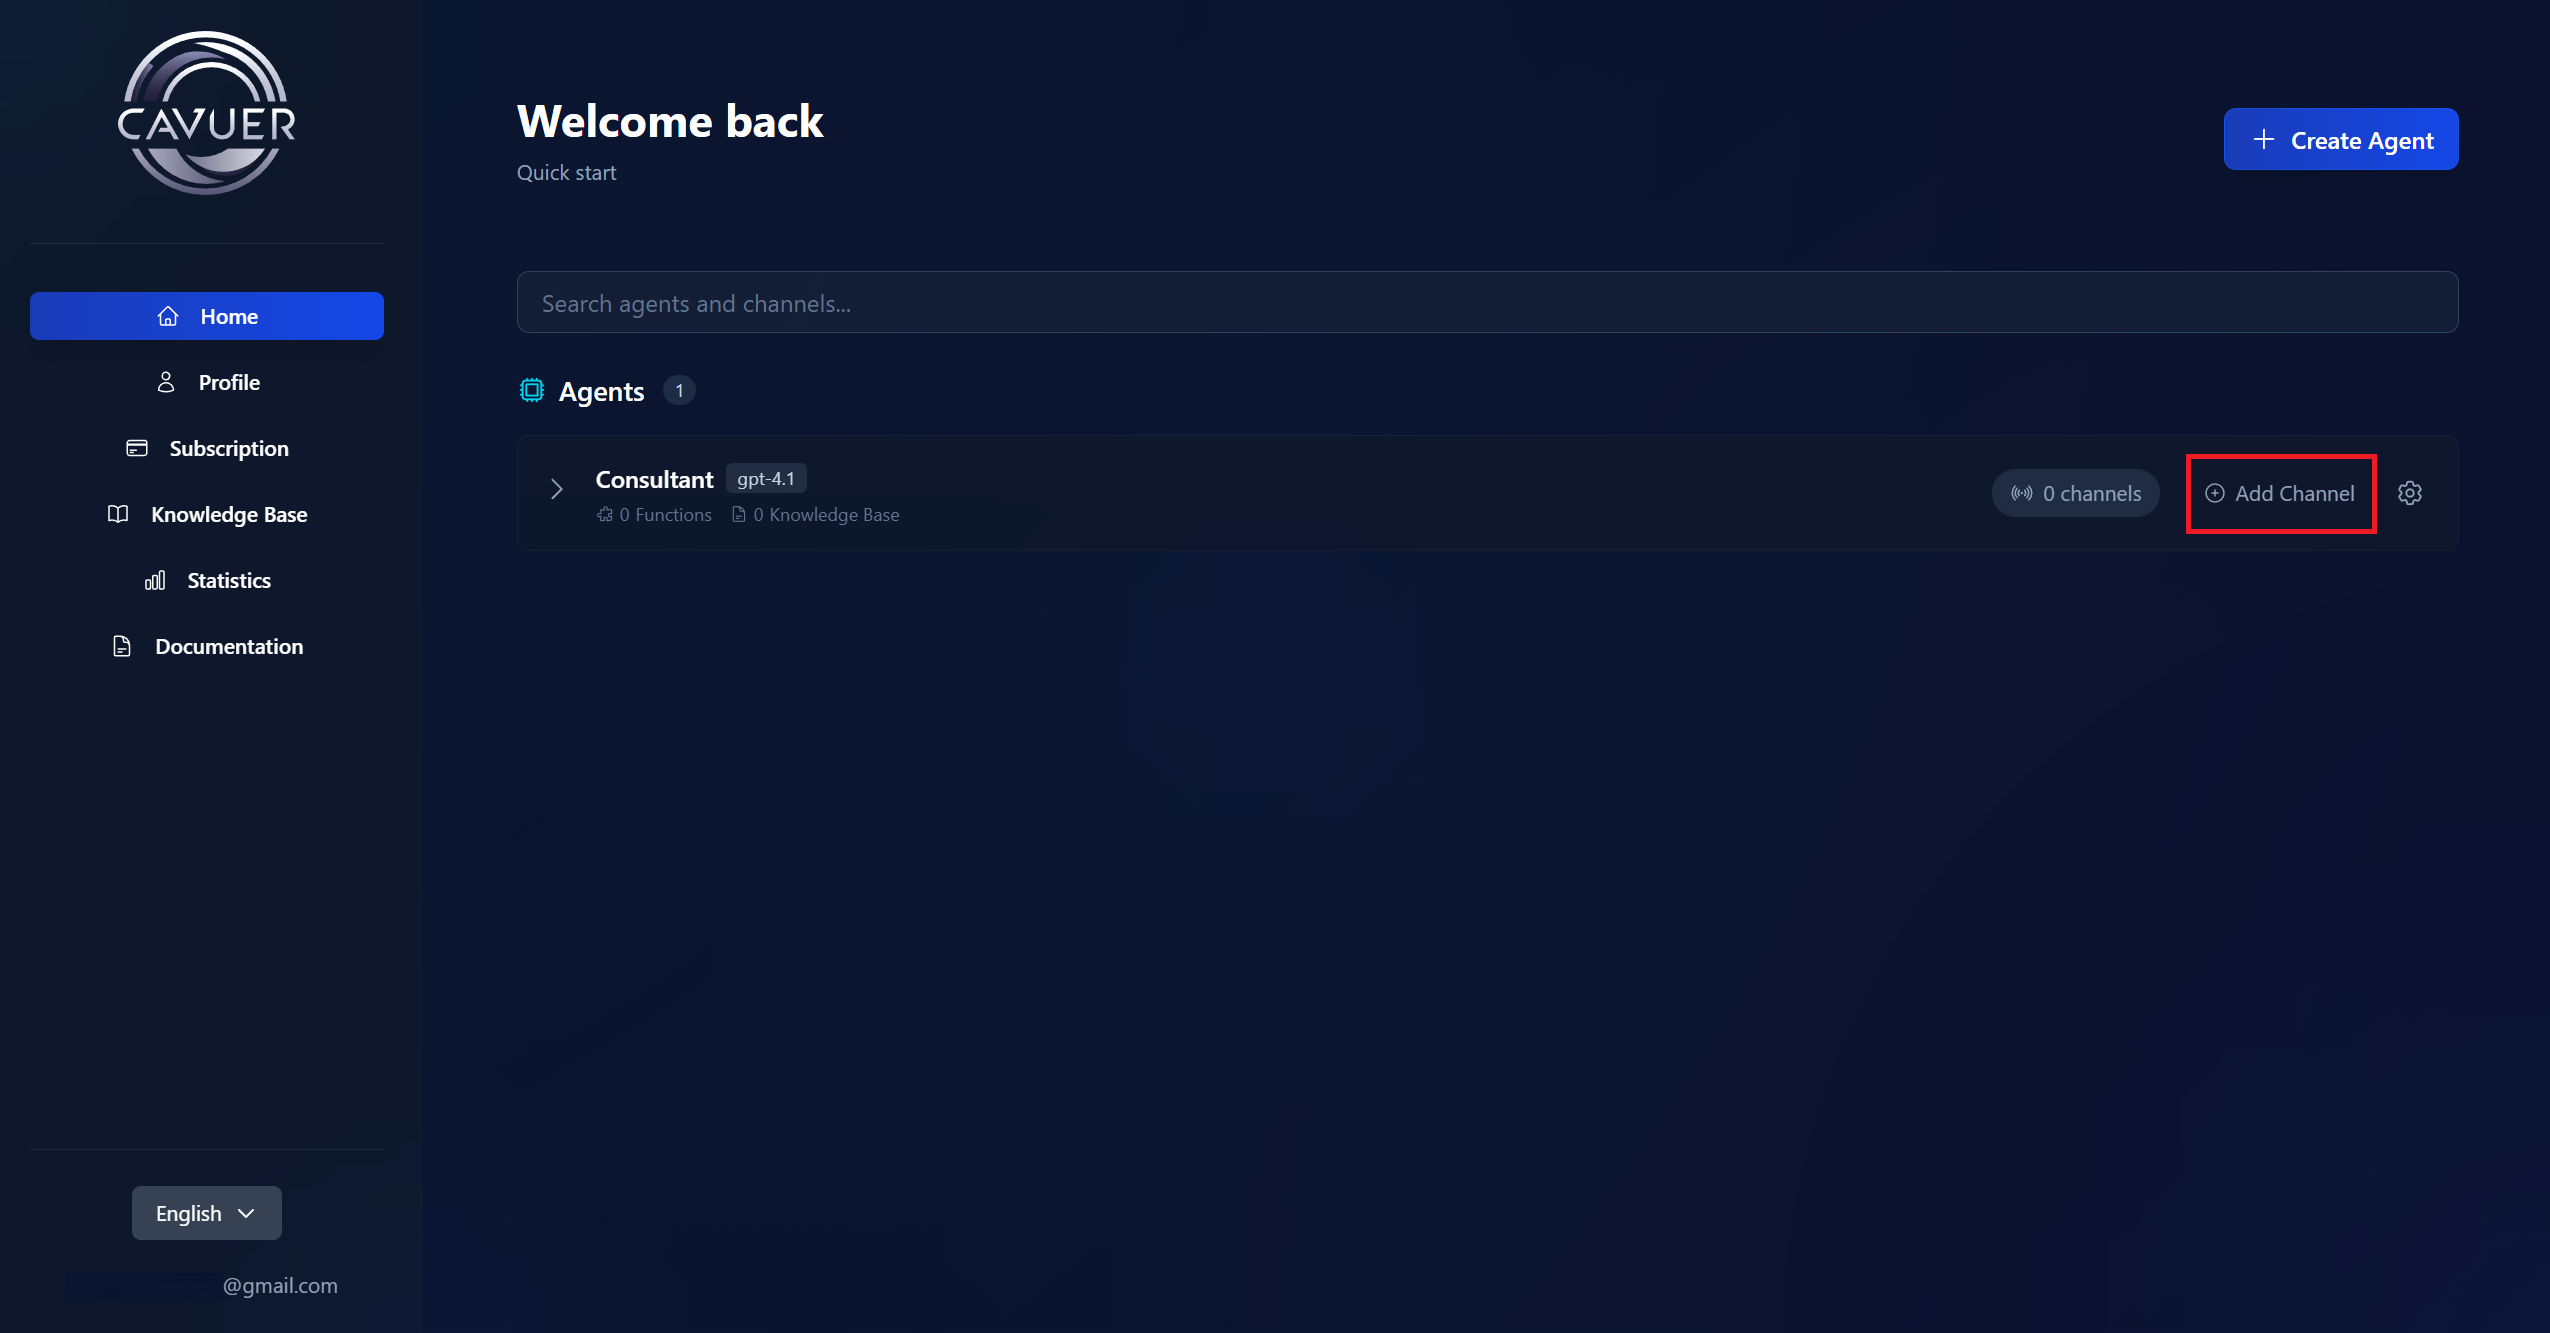
- Go to your account at console.cavuer.com
-
Click Create Agent, enter a name, select a language model, and add instructions
-
Create the required channels (Telegram, WhatsApp, etc.) and configure them
All available messengers, platforms, and integrations are listed in this article.
Step 3 — Connect Channels to Bitrix24
-
In the Cavuer dashboard, go to the Integrations section
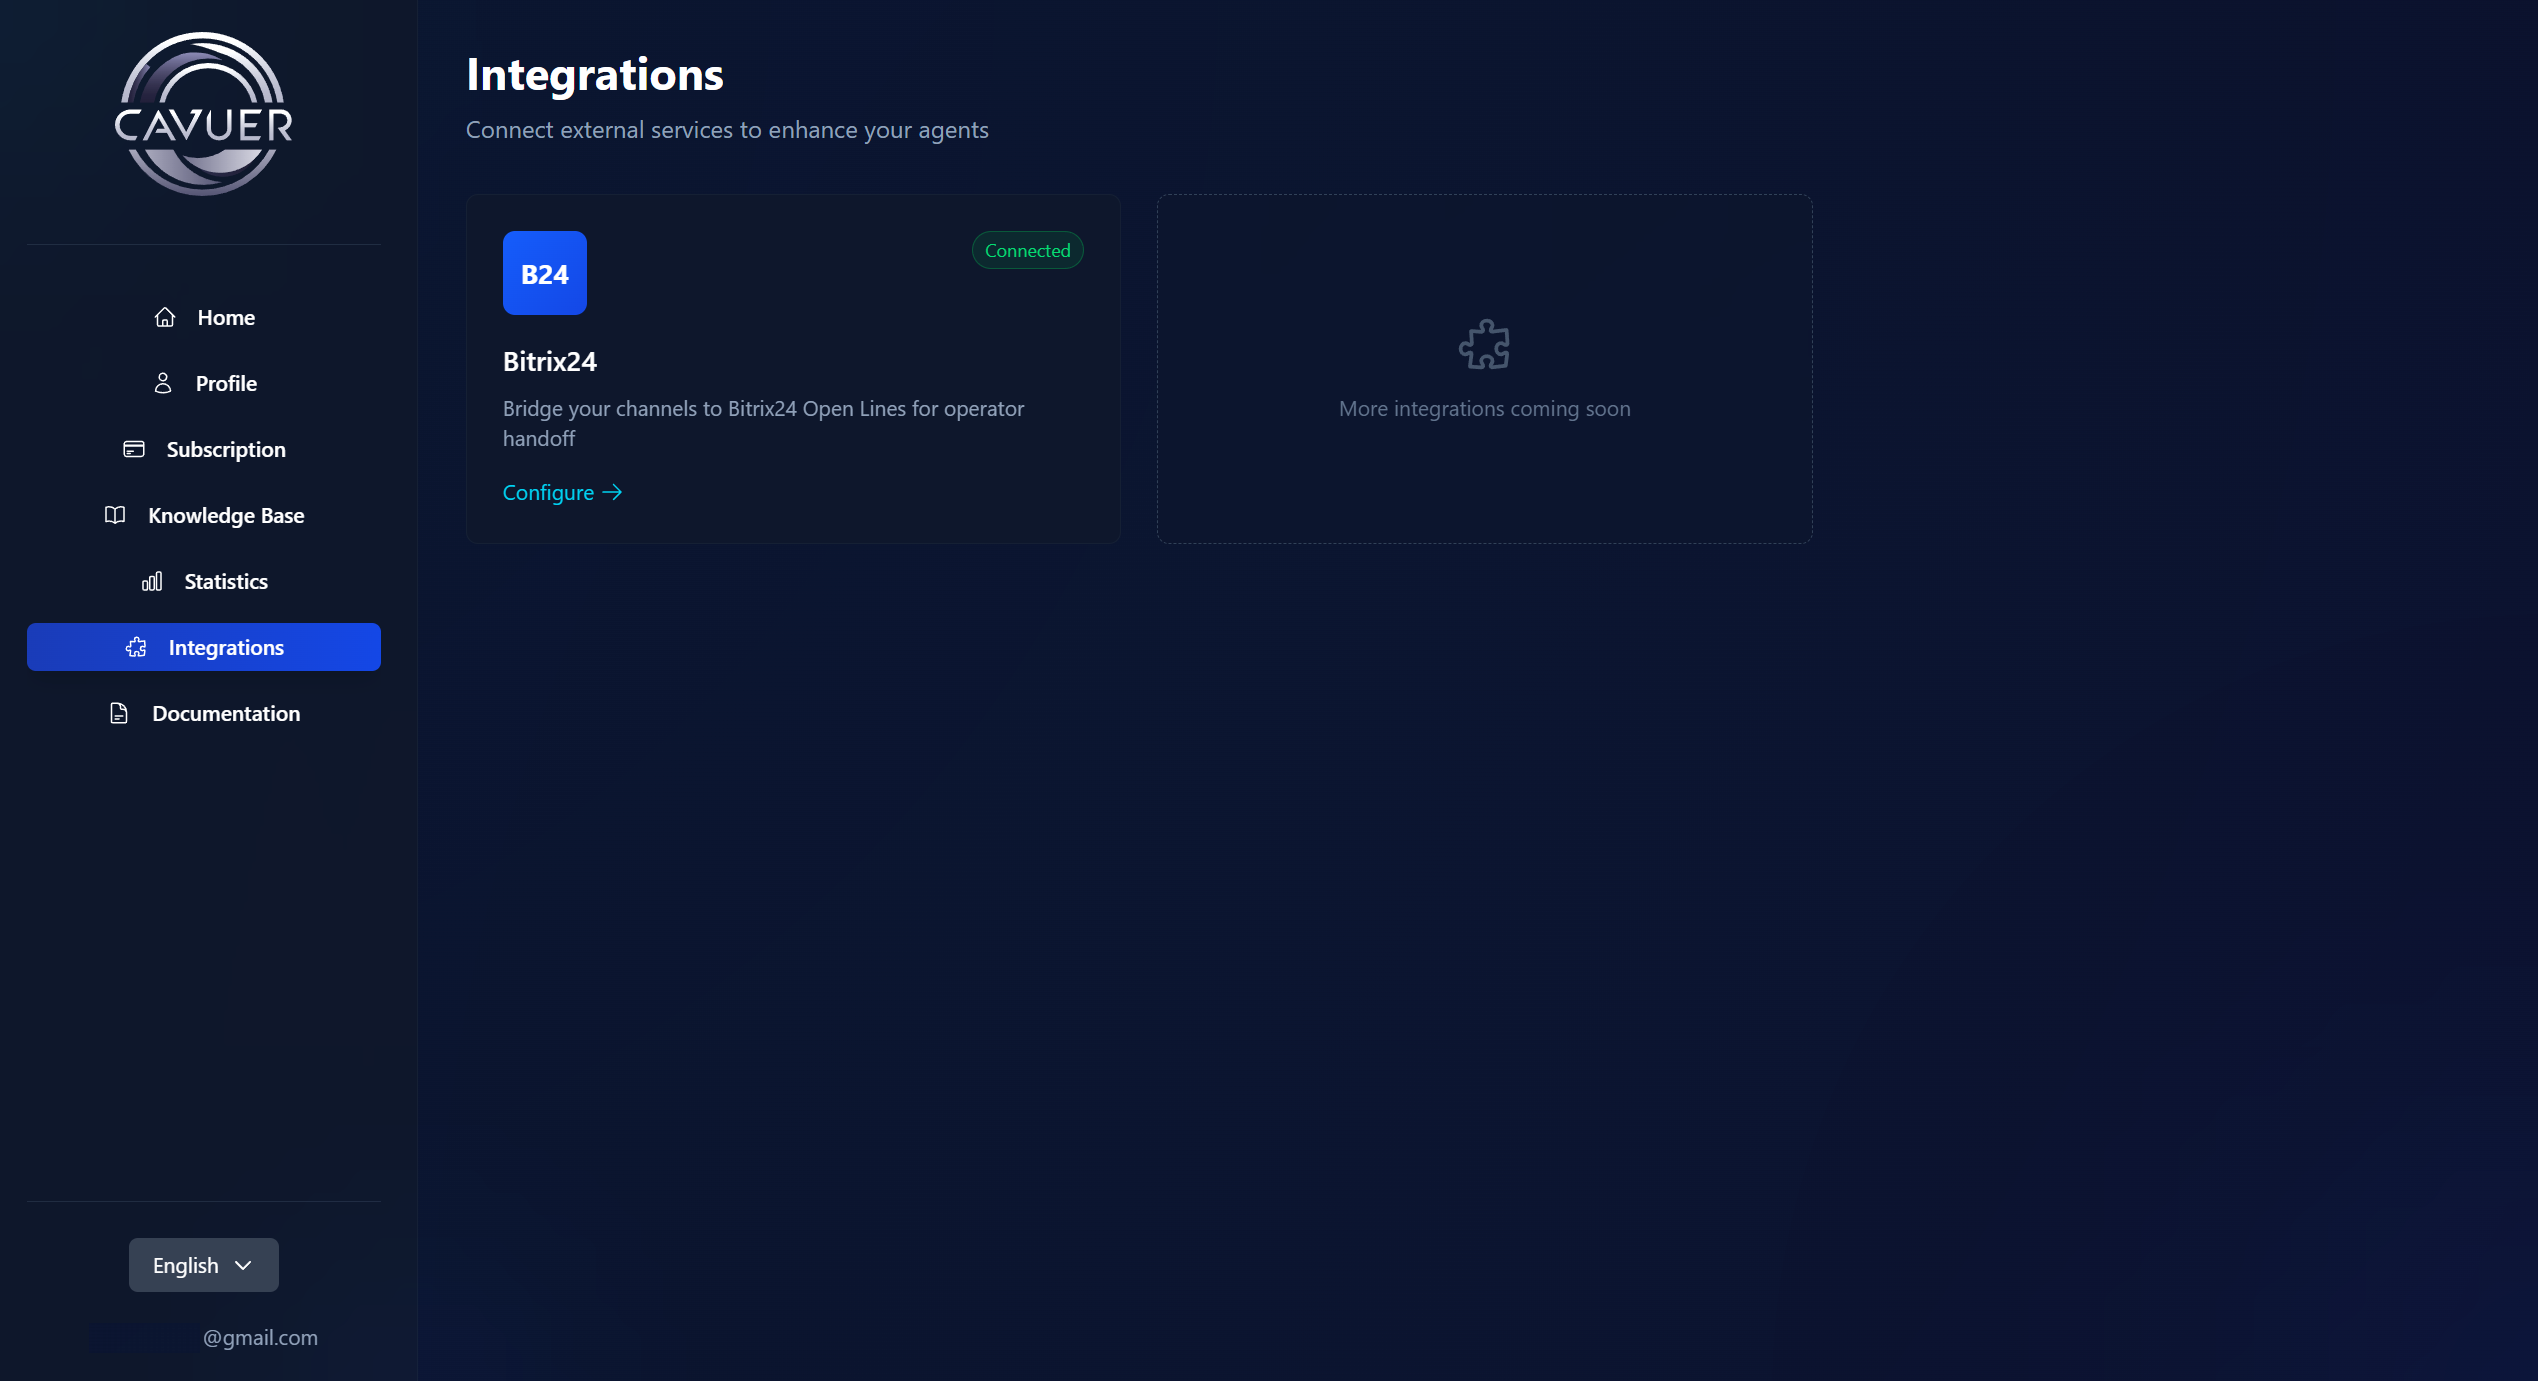
-
Open Bitrix24 — you will see a list of connected portals and available channels

-
Next to the desired channel, click Connect to Line
-
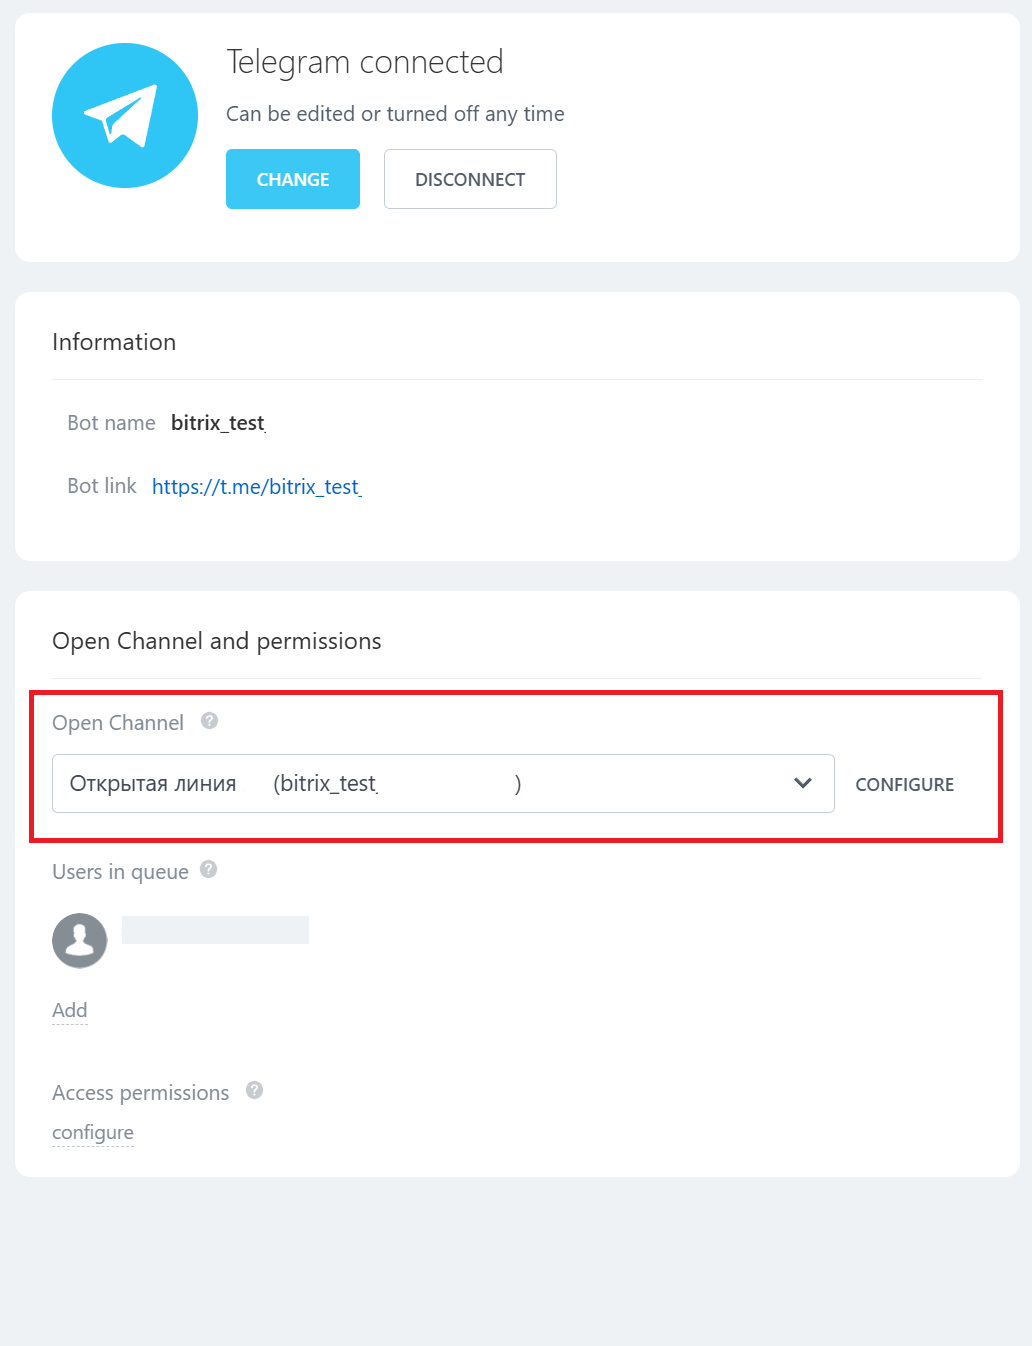
Select the connected Portal and the Open Channel in Bitrix24 you want to link the channel to
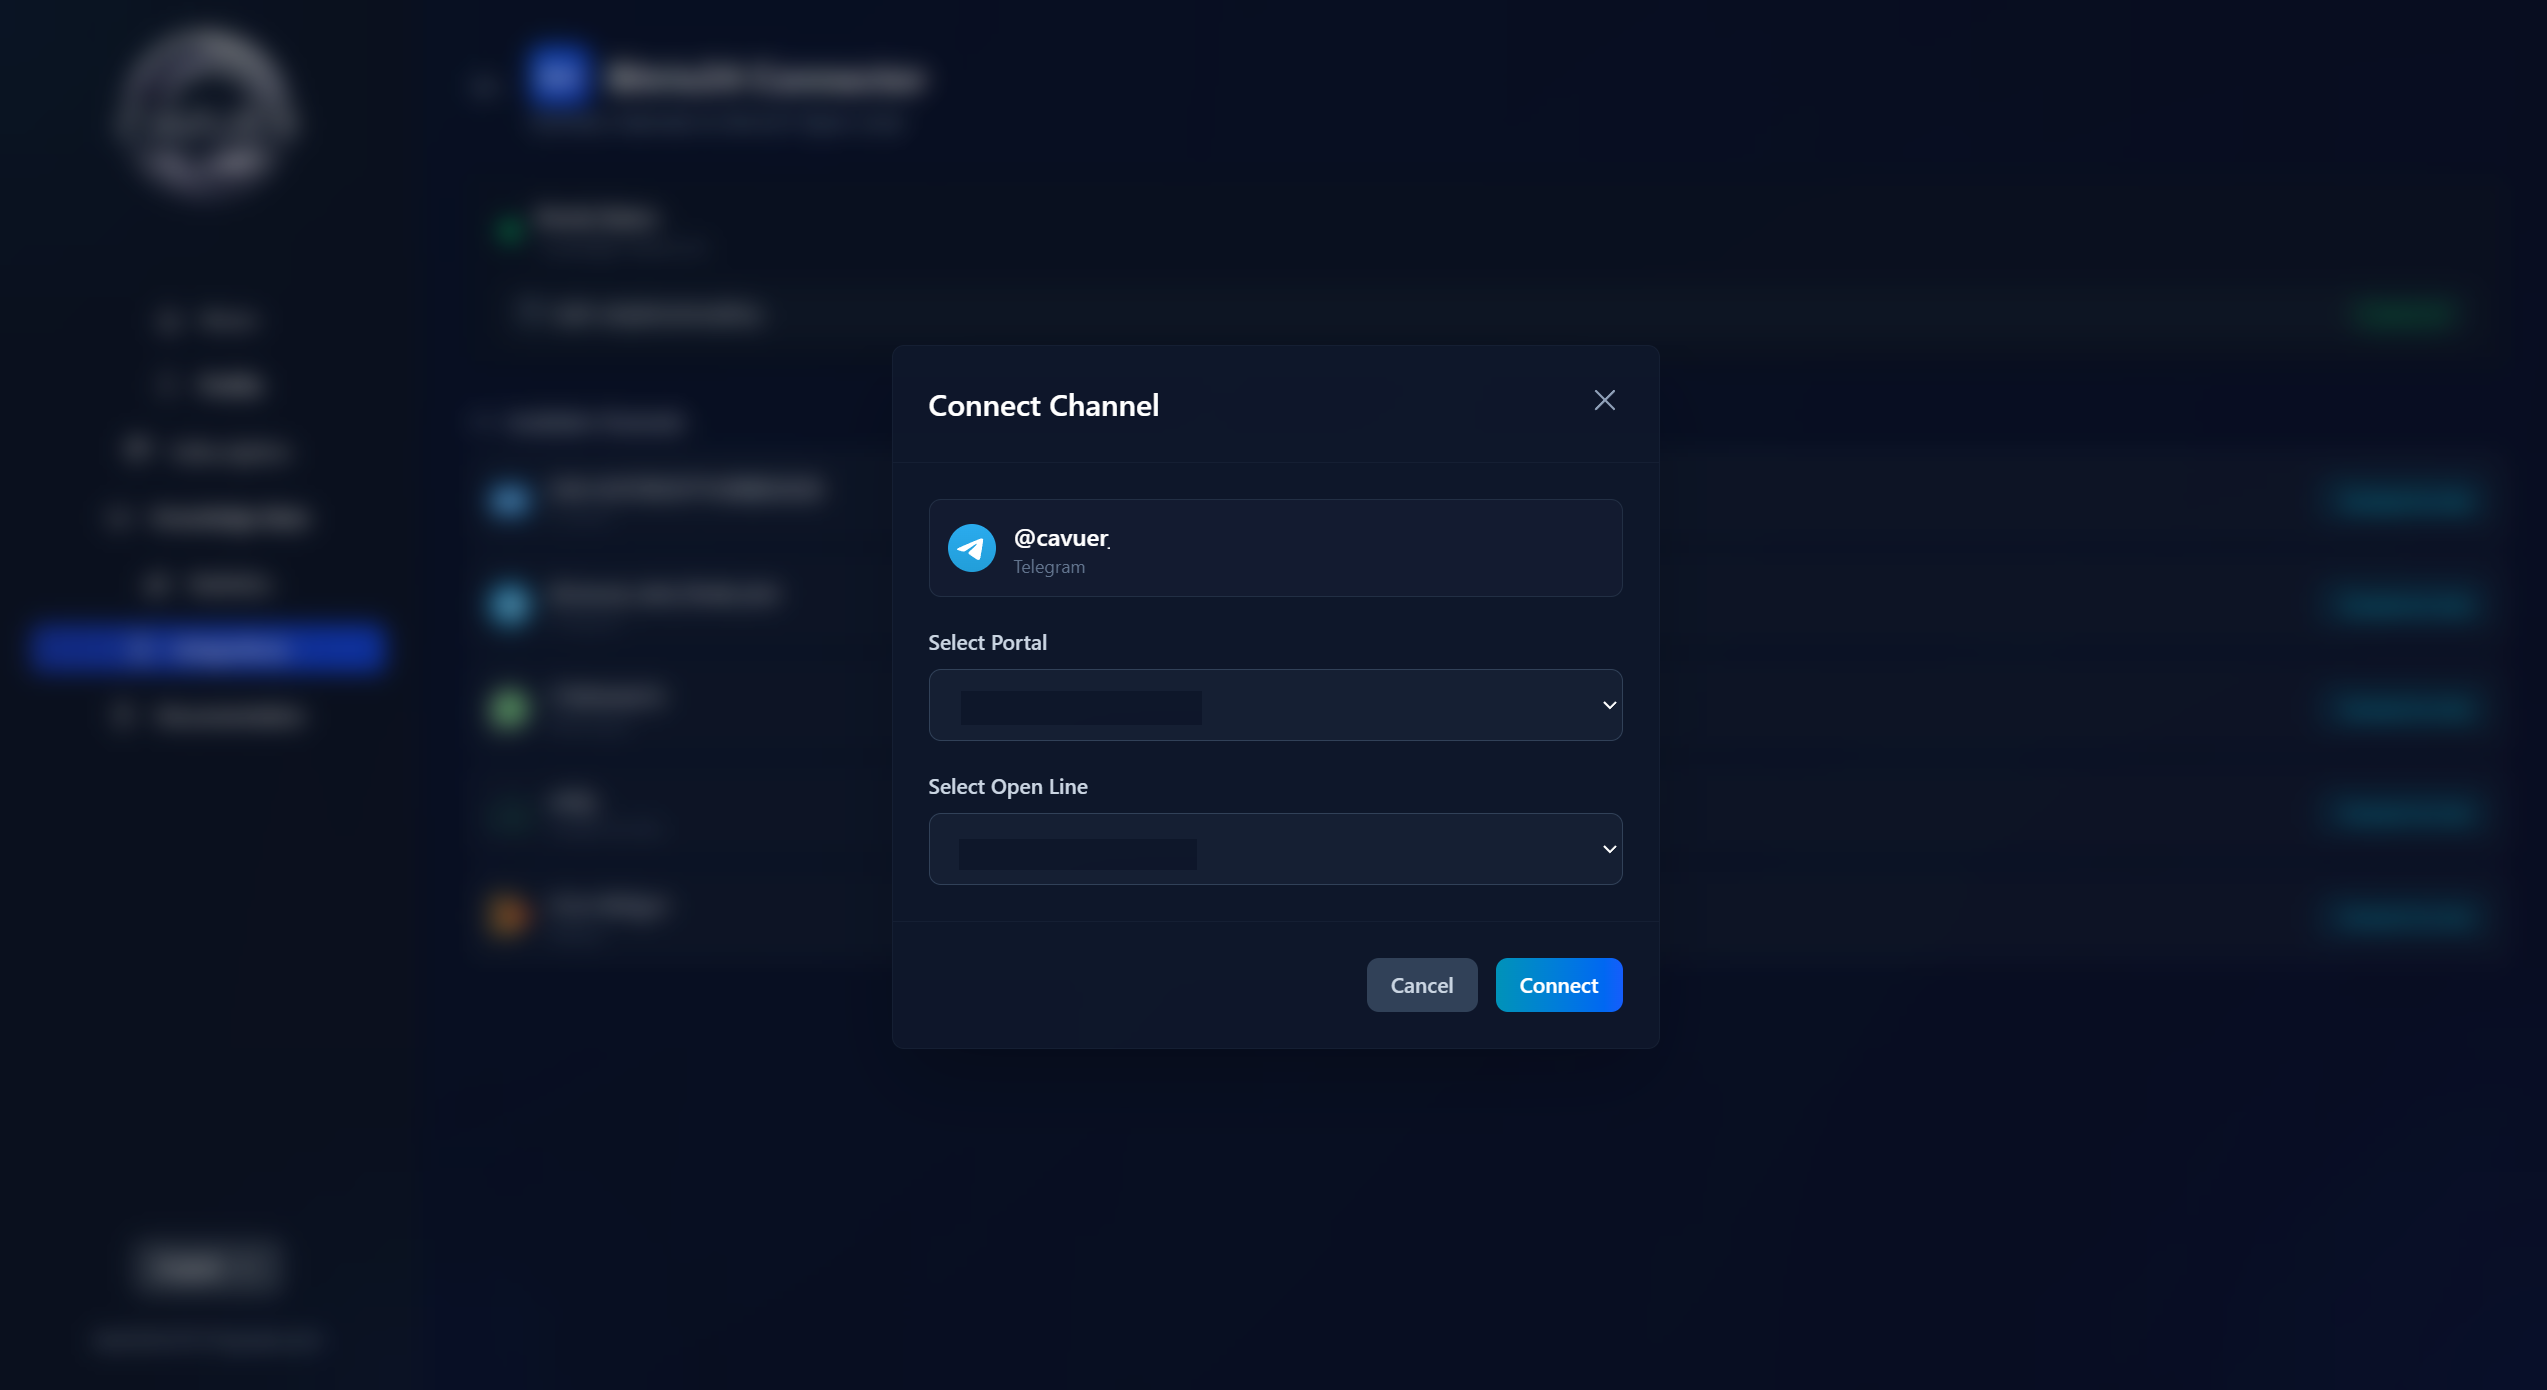
Important
You cannot connect two channels to the same Open Channel. Each channel must be connected to a separate Open Channel.
No Open Channel?
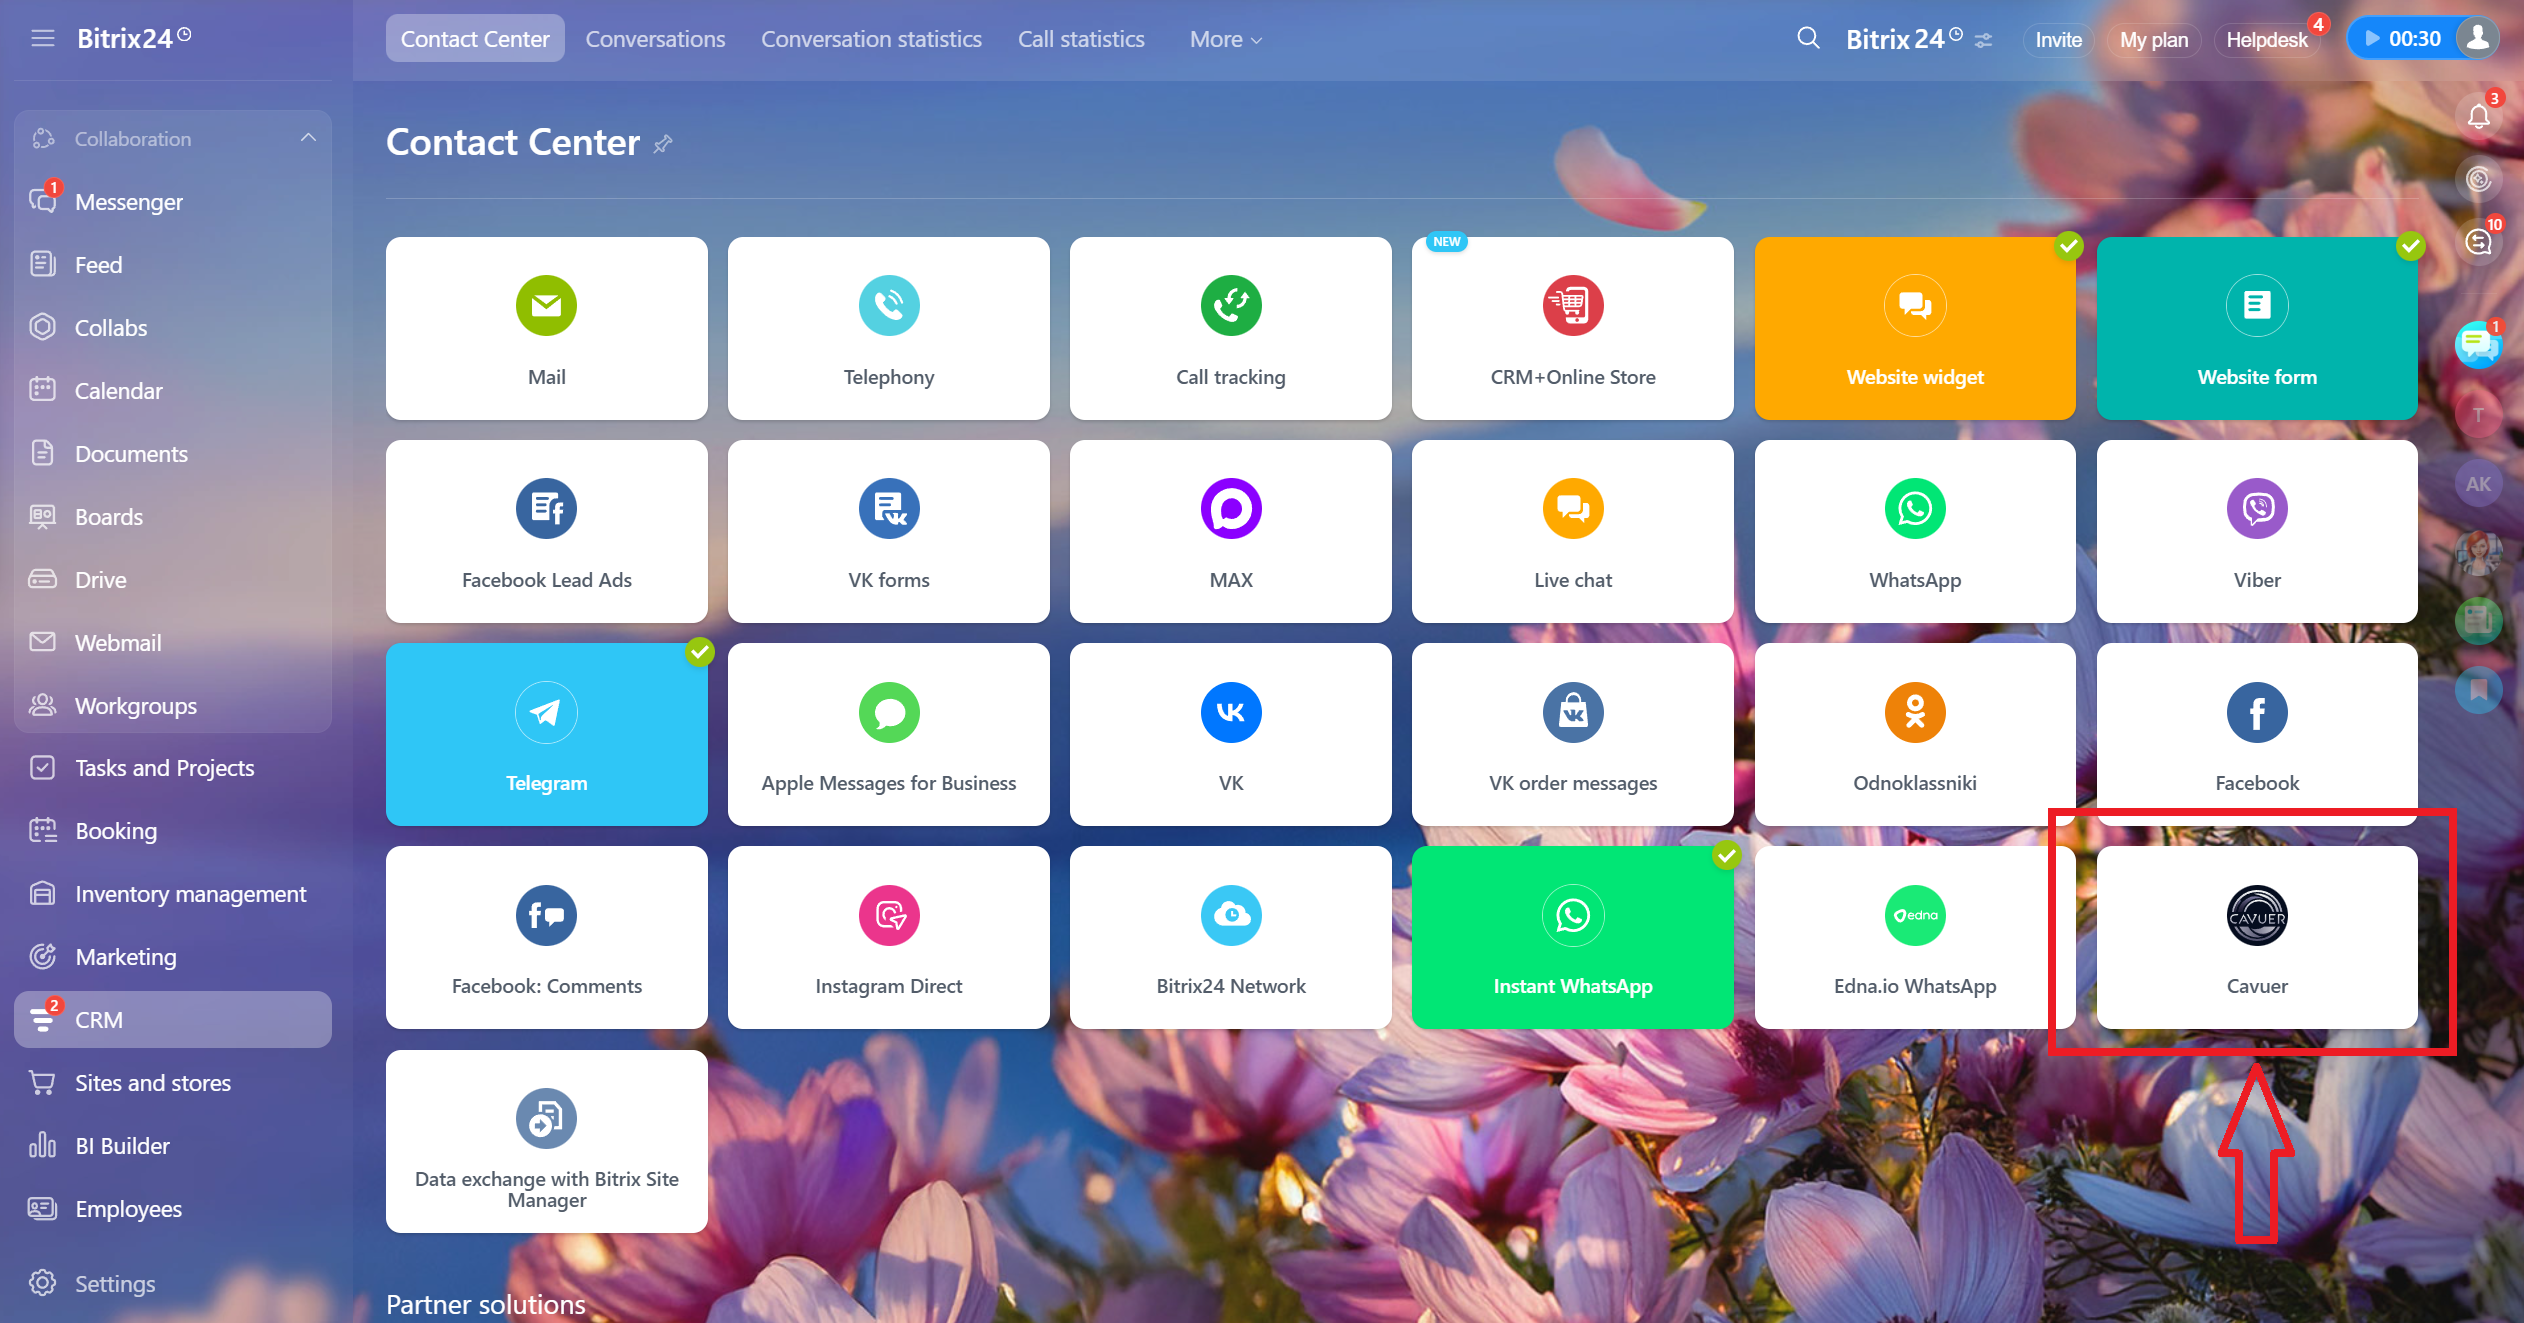
If you don't have an Open Channel yet, create one in Bitrix24:
- Go to CRM → Sales → Sales Channels → Contact Center
- After installing the Cavuer application, the Cavuer channel will appear in the Contact Center section
- Click on the Cavuer channel and create an Open Channel
 Done! Messages from connected Cavuer channels will now appear in Bitrix24. You can also reply to customers from the Bitrix24 interface — messages will be sent to the connected channels.
Advantages of This Option
- If you don't have communication channels in Bitrix24 yet, you can create them through Cavuer and connect them to Open Channels right away
- All channels (Telegram, WhatsApp, Widget, etc.) are connected and managed from the Cavuer dashboard — no need to pay extra for third-party communication channels
- The AI agent processes messages before they reach Bitrix24 — operators only step in when necessary
Important
In this option, you cannot send files from Bitrix24. You will be able to receive and view incoming files, images, and audio messages in Bitrix24 chats.
Connecting a Cavuer AI Agent as a Chatbot to Bitrix24 Channels (option 2)
Connect a Cavuer AI agent as a chatbot to existing communication channels in the Bitrix24 Contact Center (Telegram bot, WhatsApp, etc.). The agent will automatically respond to incoming requests in the connected Bitrix24 channels.
Step 1 — Install the Cavuer App in Bitrix24
- Go to your Bitrix24 portal
- Open the Market and find the Cavuer app
-
Click Install and grant the required permissions
-
Open the installed application and click Connect to Cavuer. You must be logged into your Cavuer account beforehand. If you do not have an account, you will need to register, verify your account, and log in; then, return to the application page in Bitrix24 and click Connect to Cavuer
- After this, you will be redirected to your Cavuer dashboard. Bitrix24 will be automatically connected in the Integrations section
Step 2 — Create an Agent and Bitrix24 Channel in Cavuer
- Go to your account at console.cavuer.com
-
Click Create Agent, enter a name, select a language model, and add instructions
-
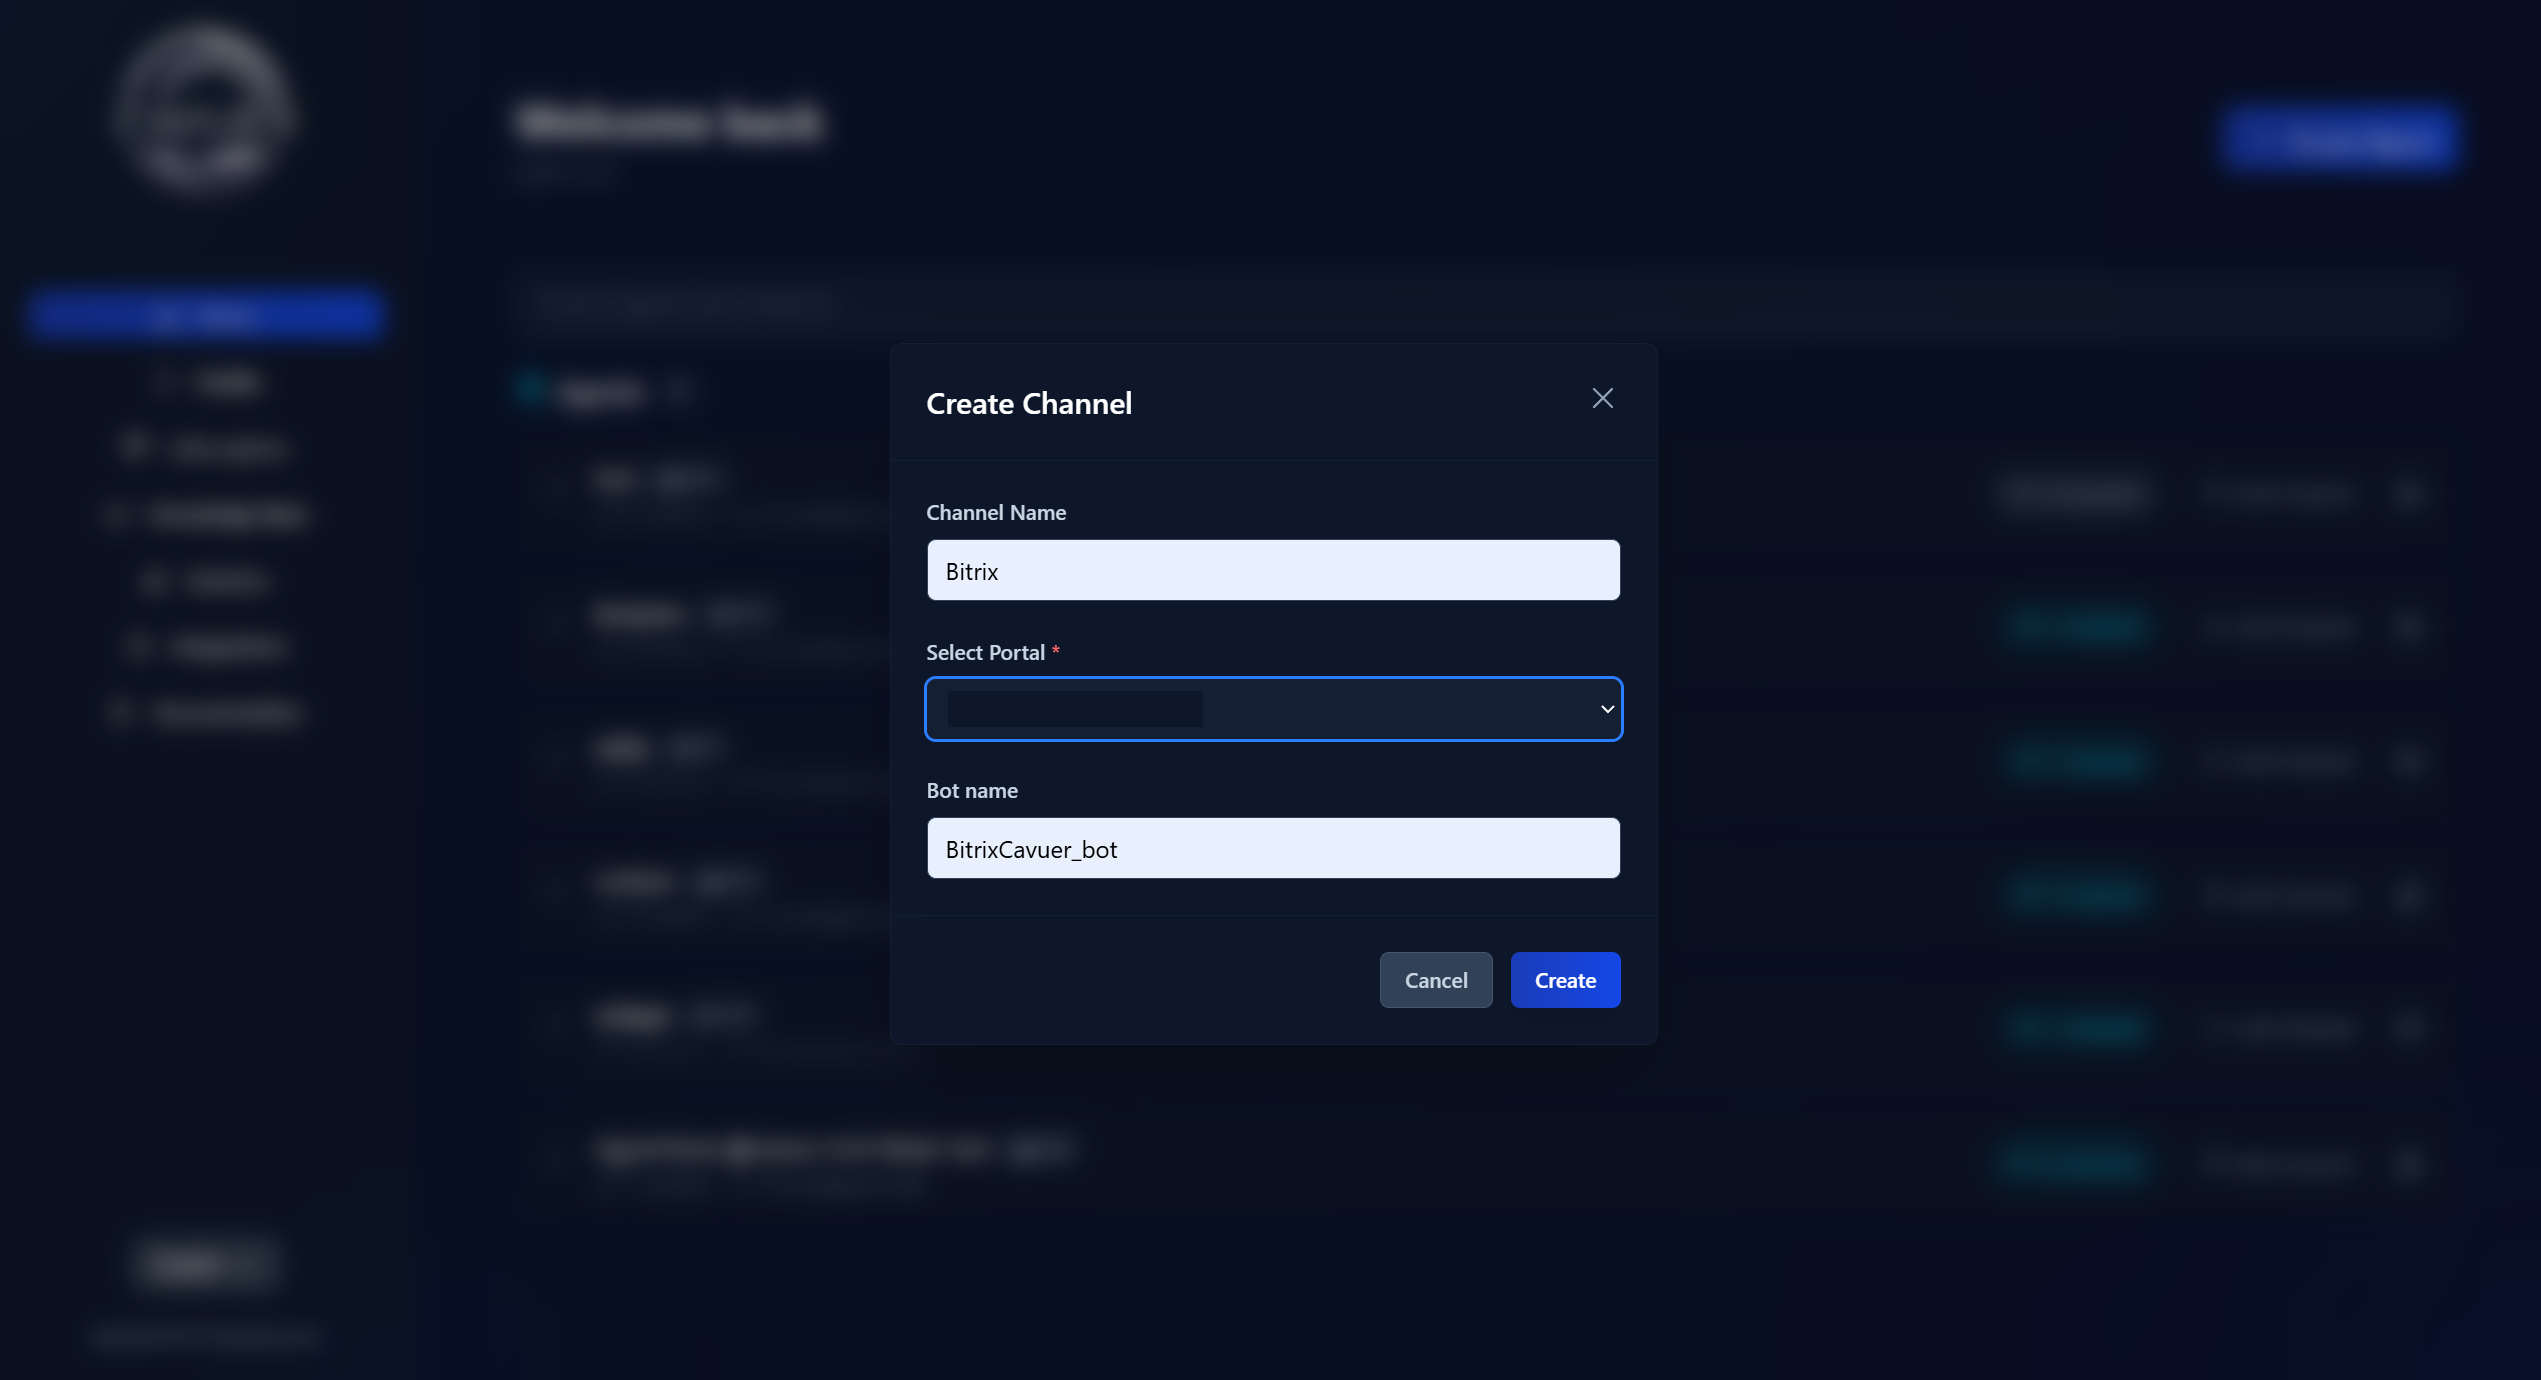
Click Add Channel and select Bitrix24. Choose the previously connected integration as the portal
Step 3 — Connect the Agent to a Channel in Bitrix24
- In Bitrix24, go to CRM → Sales → Sales Channels → Contact Center
-
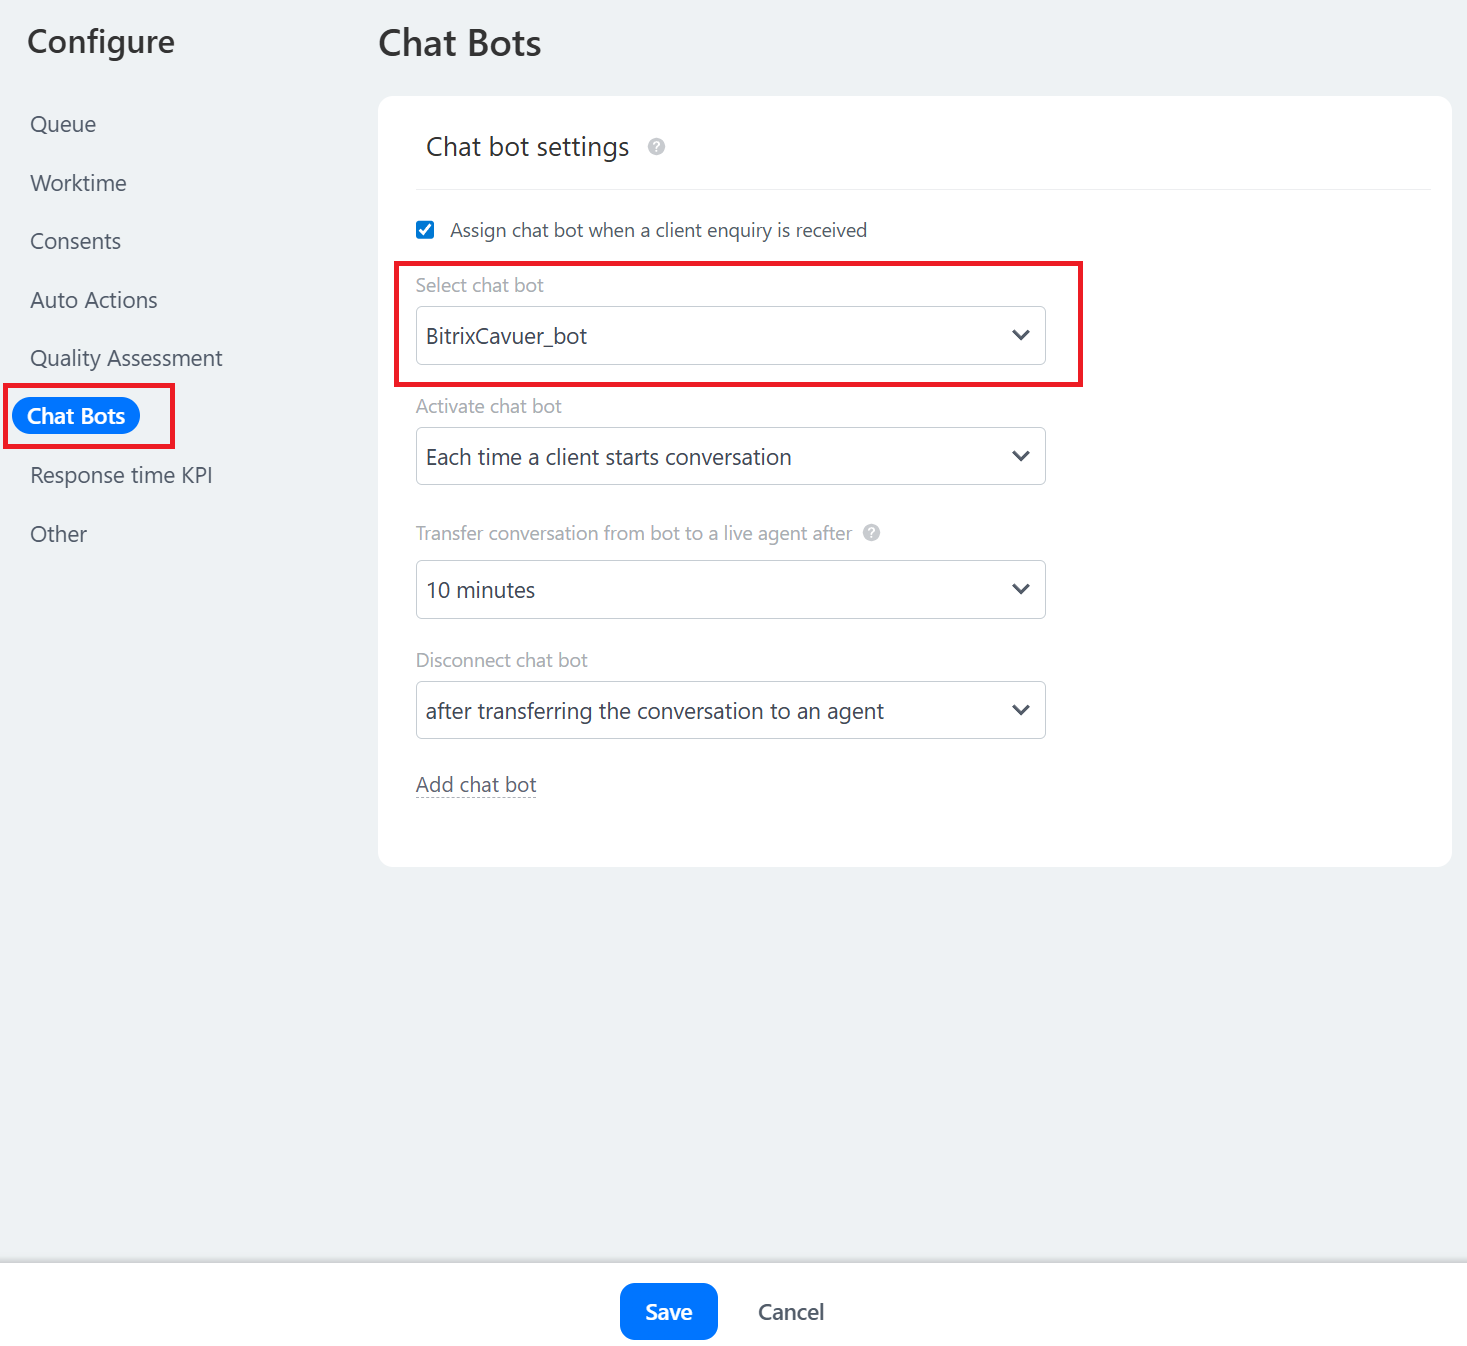
Select the connected channel (e.g. Telegram), click on it, and configure the Open Channel
-
In the Open Channel settings, go to the Chatbots section
-
Select the previously created channel from your Cavuer account as the chatbot
-
Save the settings
Done! A Cavuer AI agent is now connected to your Bitrix24 channel. It will automatically respond to incoming requests.
Advantages of This Option
- You use your existing communication channels in Bitrix24 — no need to set them up again
- All routing and request distribution settings remain on the Bitrix24 side
 Advanced Setup
Agent Settings in Cavuer Dashboard
Configure the agent's behavior at console.cavuer.com:
| Parameter | Description |
|---|---|
| Name | Rename the agent and channel for easier management in the Cavuer dashboard |
| Model | Select a language model |
| Instruction | Agent behavior rules: greeting, company description, operator transfer conditions, language settings. Specify whether the agent should respond in the customer's language or only in a specific language |
| Response Delay | Delay before responding. Useful when customers send multiple messages in a row — the agent will wait and process all messages together |
| Process Images | Allows the agent to view and analyze image content |
| Process Audio | Enables the agent to recognize voice messages |
| Knowledge Base | Upload .txt, .pdf, or .docx files and connect them in the agent settings |
Full parameter reference: Agent and Channel Setup
Knowledge Base Setup
The Knowledge Base is the agent's source of information. There are two ways to populate it:
1. Uploading individual articles. Go to the Knowledge Base section → click "Upload Data" → on the "File" or "Text" tab, enter a title and add the content (.pdf, .docx, .txt files or plain text).
2. Creating collections. Click "Collections" → "Add Collection" and choose a source type: Website, Yandex Wiki, or Confluence. Cavuer will automatically crawl and index the pages.
Then, in the agent settings under Knowledge Base, click "Link Data", select the required articles or collections, and save your changes. For more details, see Knowledge Base.
Knowledge Base Best Practices
- Break up large texts — create smaller articles for specific topics (e.g. separate articles for "Delivery", "Payment", "Returns")
- When editing, use the "Replace Source" function — simple text edits don't update the search index
- Remove unnecessary pages from collections — this improves the accuracy of relevant information retrieval
- Link to documentation — upload a brief summary and include a link to the full version
Important
If images in incoming messages are displayed incorrectly in Bitrix24, we recommend refreshing the chat page in Bitrix24.
Need Help?
If you have any questions about setting up the Bitrix24 integration, please contact us:
- Email: service@cavuer.com
- Telegram: @cavuer_ai
- WhatsApp: +7 747 697 4706